Certified Business
With over 10,000 orders
With over 10,000 orders

When you boil it down, knowing how to organize a backpack comes down to three things: Accessibility, Balance, and Compression (ABC). The trick is to get your heaviest stuff right up against your spine, keep your must-haves where you can grab them, and squeeze the air out of bulky gear to save space. Once you nail this, your pack stops being just a bag and starts feeling like an extension of your body.
Before you even think about putting gear into your bag, you have to understand the why behind it all. Packing a backpack isn't just a game of Tetris to see if everything fits. It’s about building a stable, comfortable load that works with you, not against you. This is the secret that separates a miserable slog from a fantastic adventure.
I've learned to think of my backpack as a system with different zones. Every single piece of gear has its own sweet spot based on its weight, its size, and how often I'll need to reach for it. This simple mindset shift prevents that classic, frustrating trailside "yard sale" where you have to dump everything out just to find your headlamp.
Trust me, the payoff for a well-packed bag goes way beyond just being organized. Bad weight distribution is one of the biggest culprits behind trail misery and even injuries. It’s no surprise that studies show around 70% of backpackers deal with back or shoulder pain because of a poorly balanced load. Learning how to organize your pack correctly is one of the best things you can do to protect your body on the trail.
A balanced pack also makes you more stable, which is absolutely critical when you're navigating tricky, uneven ground. A top-heavy or lopsided bag can throw you off balance in a split second, and that’s when falls happen.
Key Takeaway: The real goal isn't just to carry your stuff. It's to carry it in a way that makes it feel lighter and move as one with your body. Proper organization does exactly that by aligning the pack’s center of gravity with your own.
Getting these fundamentals right is the key to a comfortable and efficient pack. I've put together a quick table to summarize these core principles.
| Principle | Why It Matters | Quick Tip |
|---|---|---|
| Accessibility | Keeps essential items handy so you don't have to stop and dig through your pack. | Use the "brain" (top lid), hip belt pockets, and side pockets for snacks, maps, and your rain jacket. |
| Balance | Aligns the pack's weight with your center of gravity, improving stability and reducing strain. | Place the heaviest items (food, water, bear canister) in the middle of your back, close to your spine. |
| Compression | Maximizes space and creates a dense, stable load that doesn't shift around as you hike. | Use compression sacks for your sleeping bag and clothes to squeeze out all the trapped air. |
Once you start thinking in terms of Accessibility, Balance, and Compression, every packing decision becomes second nature.
These ABCs are the building blocks for any trip, but if you want to dive deeper into trail-specific strategies, check out our detailed guide on how to pack a backpack for hiking.
 Alright, here’s where the real work begins. The first, and arguably most important, step to organizing your backpack is a total gear explosion. I mean it. Find a nice, clear patch of floor, and dump out every single thing you think you need for your trip.
This visual inventory is a game-changer. It’s the only way to honestly see what you’re working with, forcing you to spot duplicates or question that "just in case" item you haven't used in three years.
Once you have your gear mountain, the goal is to transform that chaos into logical "kits." Forget just making neat piles; we’re building a modular system where everything has a designated home. It’s like setting up your kitchen drawers—you have one for cutlery, one for spices, and another for pots and pans. Simple, intuitive, and effective.
Start by identifying the main categories for your adventure. It doesn't matter if you're planning a weekend hike or a month-long international trip; the core kits tend to look surprisingly similar.
Here are a few universal examples to get you thinking:
When you start thinking in "kits," your backpack stops being a bottomless pit and starts feeling more like an organized cabinet. You’ll know exactly which "drawer" to open without having to unpack everything else just to find your toothbrush.
This drive for better organization isn’t just a personal preference; it’s a massive industry trend. The global backpack market hit a value of about $19.11 billion in 2024. Experts expect that number to grow as more and more of us demand packs with smarter, multi-compartment designs. It shows a clear shift towards gear that helps us stay organized, not hinders us. You can dig into more backpack market trends to see how brands are stepping up.
Now that you have your piles sorted, it's time to put them in their homes. This is where packing cubes and stuff sacks become your absolute best friends on the trail.
These simple tools give your gear structure and, more importantly, compression. A good stuff sack can squeeze a puffy jacket or sleeping bag down to a fraction of its original size. Packing cubes are brilliant for taming unwieldy stacks of clothes or jumbles of electronics into neat, Tetris-like blocks.
For example, your cooking kit can go into one tough stuff sack, while all your shirts and socks get neatly folded into a medium-sized packing cube.
The beauty of this method is how adaptable it is. For a simple day hike, your "kits" might just be a small bundle with rain gear and a snack pouch. For a digital nomad, it’s a dedicated electronics kit and a clothing cube. By learning to pack with this modular system, you're creating a personalized, grab-and-go setup that makes life on the move faster and way less stressful.
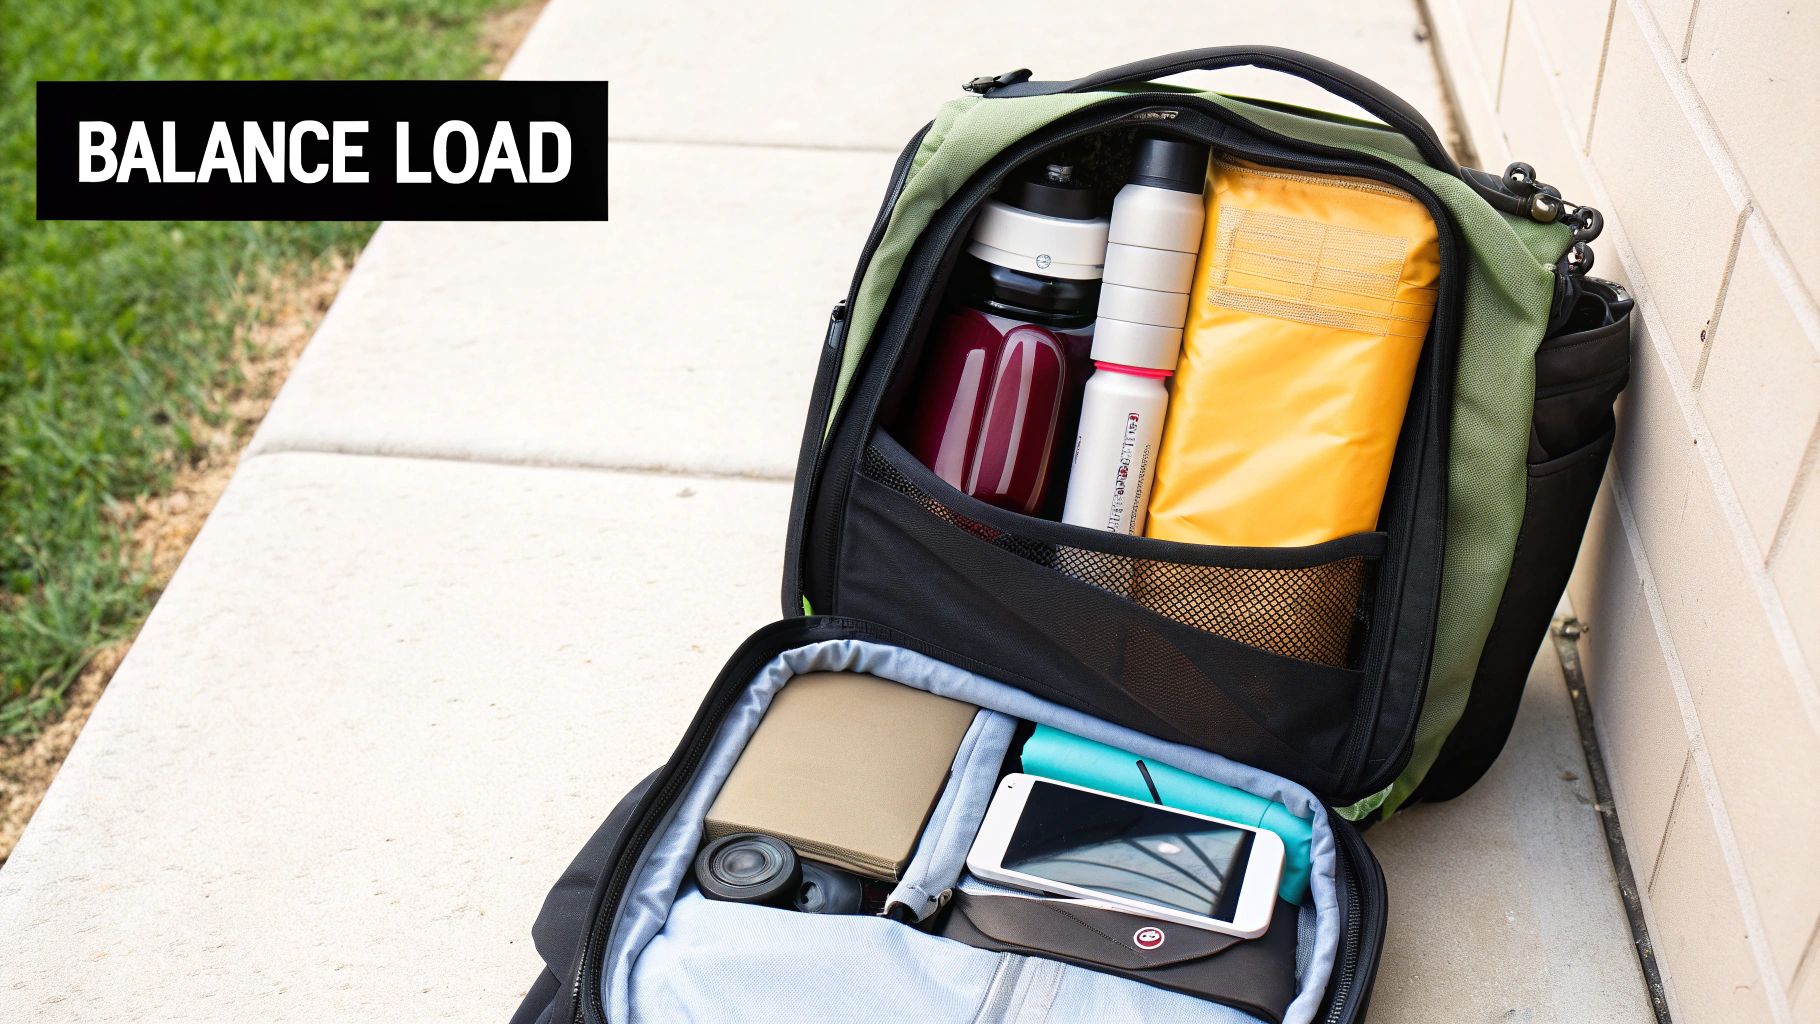
Alright, you've sorted your gear into logical piles. Now for the real magic. The secret to making a 40-pound pack feel like 25 isn't about leaving gear behind—it’s about where you put it. Smart weight distribution works with your body's natural strength and center of gravity, which means better balance and less misery on the trail.
I like to think of a backpack in three distinct vertical zones: bottom, middle, and top. This isn't just some random system I cooked up; it’s a time-tested method that aligns the pack’s weight with your own, turning you into a much more efficient and sure-footed hiker.
The very bottom of your pack’s main compartment is reserved for the big, fluffy stuff you won't touch until you’re setting up camp. This is the perfect home for your compressed sleeping bag and any extra camp clothes you've shoved into a stuff sack.
It might feel a little backward to put bulky things down there, but because they're light, they won’t create a sagging weight that drags on your hips or yanks your shoulders back. Instead, they create a solid, stable base for the heavier items to sit on top of.
Pay attention here, because this is the most critical part of packing. Your heaviest items—think your food bag, a full water reservoir, or that trusty cook set—need to go in the middle of your pack, snuggled up as close to your spine as possible.
This placement lines up the densest part of your load with your body’s center of gravity, which for most people is right around the lower back. When heavy gear is centered and rides high against your back, your hips can take the brunt of the weight. That’s exactly what a good backpack frame is designed to help you do.
Pro Tip: If your pack has a sleeve for a hydration reservoir, use it. It’s not there by accident. Its position right against your back panel makes it the perfect spot for carrying the weight of 2-3 liters of water.
Get this wrong, and you'll feel it immediately. Heavy items at the bottom will constantly feel like they're trying to pull you over backward. Put them too high, and you'll feel tippy and unstable with every step. If you really want to geek out on the physics, our complete guide on backpack weight distribution covers some more advanced techniques.
This infographic really helps visualize how to assign your gear to the right spots.
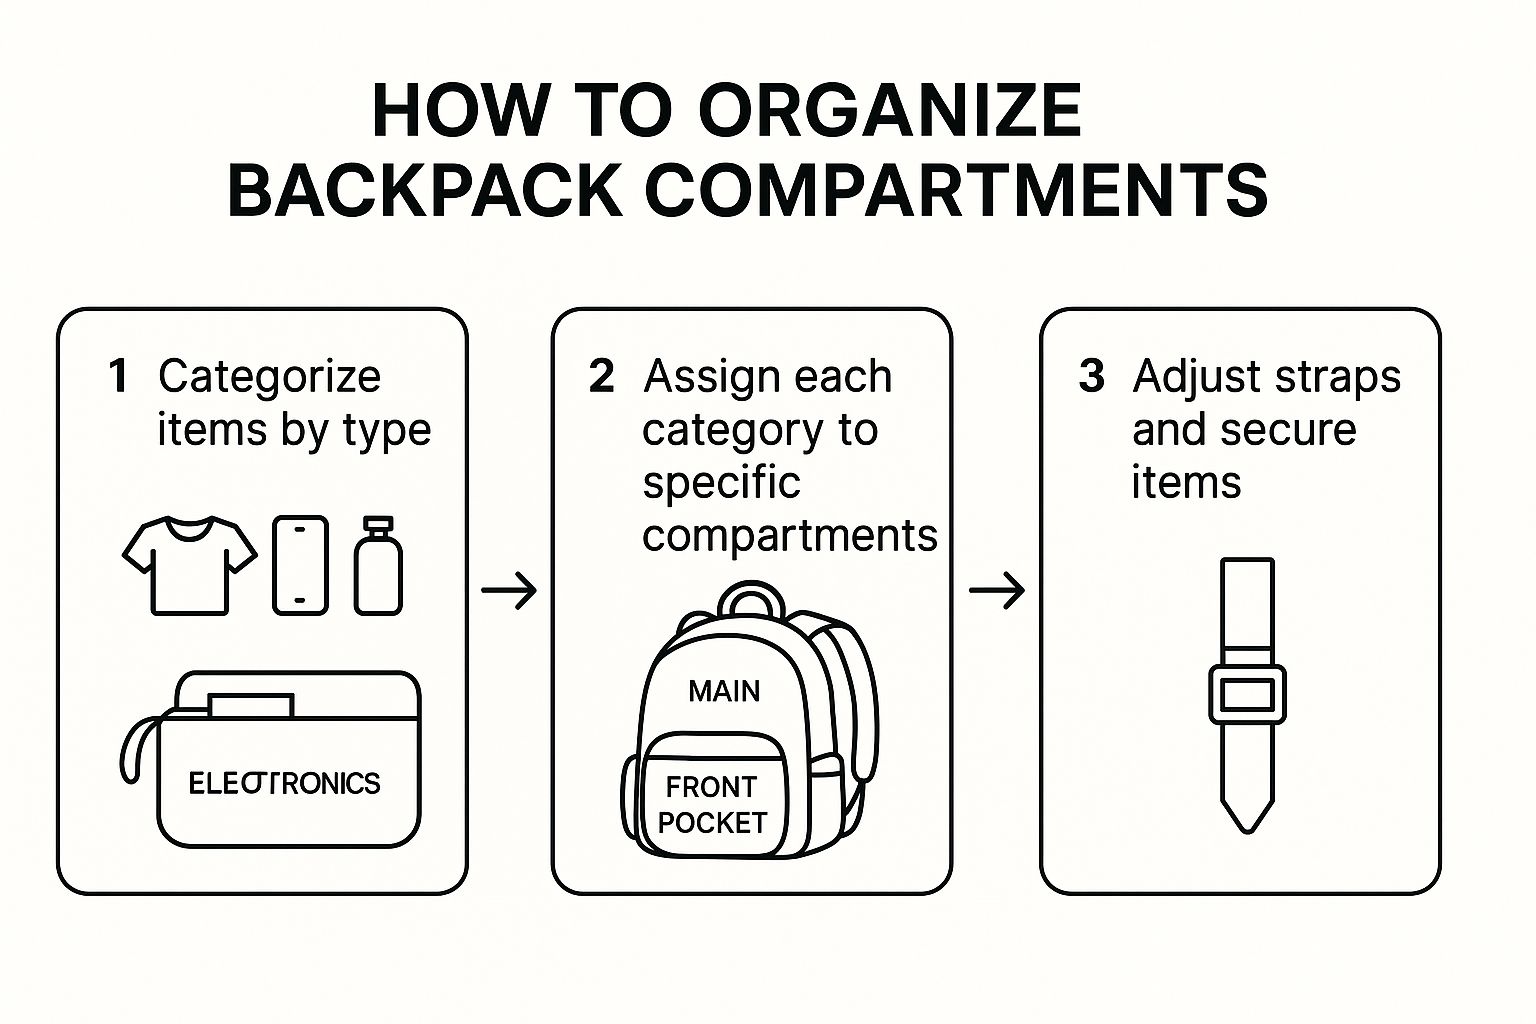
As you can see, the process flows from big-picture categories down to specific placement, ending with the final step of securing everything for a stable hike.
Finally, we have the top of the main compartment and all those glorious outer pockets. This is prime real estate for the lighter, essential gear you need to grab on the fly—basically, your "quick-access" kit.
Once everything’s in, crank down all your compression straps until they’re tight. This step is just as important as the initial packing. It stops your gear from shifting and throwing you off balance. A dense, solid pack that moves with you is the final piece of the puzzle, ensuring every step feels balanced and comfortable.
Okay, you’ve sorted your gear and have a game plan for where the heavy stuff goes. Now for the real fun: making it all fit. The trick to creating more space isn’t magic—it’s about systematically getting rid of all that useless, empty air. Your mission is to turn soft, bulky items into dense, solid blocks that slot together like a puzzle.
This isn't just about cramming more stuff in, either. A tightly compressed pack is a stable pack. When your gear can't shift around, your pack won't get lopsided and throw you off balance halfway up a switchback.
Most hikers know to use a compression sack, but how you use it makes all the difference. Don't waste time neatly folding your sleeping bag. Instead, just stuff it in there, letting it fill every single nook and cranny inside the sack.
Once it's stuffed, then you can start tightening the straps. The key is to work your way around the sack, cinching each strap just a little bit at a time. This puts even pressure on the contents and can shrink a puffy jacket or sleeping bag by 30-50%, turning it into a firm, easy-to-pack cylinder.
A rookie mistake I see all the time is yanking one strap down as tight as it will go before touching the others. This just creates a lumpy, awkward shape that’s a pain to pack. Gradual, even compression is the secret.
Not everything belongs in a compression sack. For your clothes, learning a couple of smart folding techniques can free up a surprising amount of room. The "ranger roll" is my go-to for t-shirts, pants, and socks. It creates tight little logs of fabric that won't unroll and create chaos inside your pack.
Beyond just rolling, start thinking about how your gear can fit inside other gear. This is where nesting comes into play.
Getting into this mindset of filling every void is what separates a good packer from a great one. This challenge isn't unique to backpacking, of course. If you need more inspiration, you can find some great organization ideas for small spaces that translate perfectly to packing a backpack.
When you're out on the trail, traditional compression sacks are almost always the better choice. They’re tough, you can use them over and over, and they don't need any special equipment.
Vacuum bags might seem tempting because of how much air they remove, but they have some serious downsides for backpackers. You usually need a vacuum to reseal them—not exactly practical at a campsite—and the thin plastic is far more likely to get punctured.
By combining smart rolling, nesting your items, and using your compression sacks properly, you can open up a ton of volume in your pack and create a solid, stable load that’s ready for any adventure.
You can have the best packing strategy in the world, but it won't mean much if your gear is fighting you every step of the way. I’ve seen it happen—even the most meticulous packer can be brought to their knees by bulky, awkward equipment. This is where it all comes together. Investing in smartly designed, packable gear is the final piece of the puzzle.
The real goal is to choose items that practically disappear until you need them.
Take our Trekology trekking poles, for instance. A pair of modern, foldable poles can collapse to fit inside your pack’s side pocket. Compare that to older styles that have to be awkwardly strapped to the outside, just waiting to snag on the first branch you pass. This isn't just about saving a little space; it’s about creating a streamlined, hassle-free experience on the trail.
The same idea applies to your camp furniture. A classic folding chair is a packing nightmare, but a modern portable camp chair breaks down into a small, manageable bundle. It slides right into your pack’s main compartment instead of dictating how you pack everything else around it.
Today’s best outdoor gear is engineered with packability as a top priority. A perfect example is an inflatable pillow that squishes down to the size of a soda can. It gives you that much-needed comfort at night but takes up virtually no room during the day. That frees up precious space for essentials like extra food or a warmer jacket.
This focus on compact design isn't new; it has deep roots. The history of backpack design shows a clear evolution toward compartmentalization and integrated features, which directly influences how we pack. As bags evolved from simple sacks into the multi-pocket systems we see today, the gear meant to go inside them evolved right alongside.
Key Insight: Choosing packable gear isn’t a luxury—it’s a core part of effective backpack organization. Every bulky item you replace with a compact alternative is a victory for your back and your sanity on the trail.
It's also helpful to look at how different types of bags are designed for specific uses. You can learn a lot from them. For instance, exploring the benefits of a diaper bag backpack shows just how effective thoughtful compartmentalization can be. Every pocket has a purpose, a lesson we can apply to our own hiking and camping setups.
Your gear choices directly shape how well you can pack. To make it even clearer, I've put together a quick comparison of how traditional gear stacks up against modern, packable alternatives from Trekology.
Choosing products specifically designed for packability and organization can completely change your experience. Here's a look at how upgrading a few key items makes a massive difference in saving space and simplifying your packing process.
| Gear Type | Key Feature for Organization | Packing Benefit |
|---|---|---|
| Trekology ALUFT 2.0 Pillow | Inflatable and ultralight | Compresses down to the size of a soda can, freeing up a surprising amount of space. |
| Trekology YIZI GO Chair | Collapsible frame design | Packs into a small, slender carry bag that slides easily into a backpack. |
| Trekology TREK-Z Poles | 3-section foldable design | Collapses small enough to fit inside a pack’s side pockets, preventing snags. |
As you can see, a few smart swaps go a long way. By actively selecting gear that is compact, lightweight, and designed for packability, you lay the foundation for a perfectly balanced and organized pack.
This proactive approach makes the entire process of packing simpler and far more effective. For even more advanced strategies on this, check out our complete guide on camping gear organization.
Even the most seasoned hikers run into packing puzzles. What do you do when the trail throws you a curveball? Let’s dive into some of the most common questions I get about organizing a pack for those tricky, real-world situations.
Think of this as your go-to guide for sorting out those last-minute packing dilemmas.
This is a classic one. You’re planning a trip that involves trekking through the mountains and exploring a city. You definitely don’t want to haul muddy gear into a nice cafe, but you can’t bring two separate wardrobes.
The secret? A modular system built around packing cubes.
With this setup, you can leave your hiking gear cube at the hostel or hotel, grab your city cube, and head out with a light daypack. When it's time to hit the trail, just swap them out. Easy.
Your main backpack essentially becomes a "base camp" for your gear. This compartmentalized approach is the most efficient way to stay nimble and organized without double-packing.
Nothing ruins the vibe faster than the smell of funky, damp clothes seeping into everything you own. Managing dirty laundry on the trail isn't just a preference—it's essential for keeping your clean gear, especially your sleeping bag, fresh and dry.
This is a non-negotiable: always carry a dedicated, waterproof dry sack or even just a sturdy trash bag for laundry. Don’t mix your dirty stuff with your clean stuff. Ever. When you pack, keep this "laundry bag" near the top of your pack or in an outside pocket. That way, you can stuff dirty socks in there without having to tear your entire bag apart.
Yes, absolutely! But you have to be smart about it. Those little zippered pockets are pure gold for the gear you need to grab in a hurry without dropping your whole pack.
Think of them as your quick-access storage for:
Just be careful not to put anything too heavy or valuable in them. Heavy items will throw off your pack's balance, and let’s be honest, outer pockets are less secure in crowded places. Use them for your low-value, high-use items.
At Trekology, we believe that a smart organization starts with smart gear. Our ultralight, compact equipment is designed to solve these exact packing challenges, helping you create a lighter, more comfortable, and perfectly balanced pack for any adventure. Discover gear that makes packing easier at https://trekology.com.
Leave a comment