Certified Business
With over 10,000 orders
With over 10,000 orders

Photo by Clay Banks on Unsplash
Ankle support for hiking is all about stabilizing your joints when the ground underfoot gets unpredictable. Think of it as a trusty co-pilot for your feet, giving you the reinforcement needed to tackle tricky trails with more confidence and less fatigue.
Let’s use an analogy. Imagine your ankles are the suspension system on your car. On a smooth, paved road, the ride is a breeze, and that suspension is barely working. But what happens when you turn onto a rugged, rocky mountain trail? Suddenly, that same system is working overtime, absorbing every shock and keeping the vehicle from tipping over.
That's precisely what your ankles are doing on a hike. Every single step on an uneven surface forces them to make tiny, lightning-fast adjustments just to keep you balanced. After thousands of steps, this constant stress leads to muscle fatigue, which is exactly when your ankle is most likely to roll or twist.
So, proper ankle support for hiking isn't just about avoiding a dramatic, trip-ending injury. It's about making your entire hike better by ensuring every step you take is more stable and efficient.
Walking on flat ground is a pretty predictable motion for your feet and ankles. But the trail throws all that predictability out the window. One moment, your foot is landing flat, the next it's on the edge of a rock, a slippery root, or a patch of loose gravel.
Good ankle support acts like an external stabilizer. It limits the excessive side-to-side wobble (the technical terms are inversion and eversion) that causes most sprains. By providing this structure, your muscles can focus less on just staying upright and more on propelling you forward. The result? A more powerful stride that doesn't tire you out as quickly.
"Think of ankle support as a framework that guides your joint through a safe range of motion. It doesn't immobilize your ankle but rather provides boundaries, preventing the kind of sudden, awkward movements that cause injury on unpredictable terrain."
This becomes even more crucial when you're carrying a backpack. That extra weight raises your center of gravity and multiplies the force on your joints, making solid stability an absolute must.
While stopping an injury before it happens is the main event, the benefits of good ankle support go way beyond that. It’s a performance tool for hikers of all experience levels.
The sheer number of ankle injuries each year really drives home the importance of this. In the United States alone, an estimated 2 million ankle sprains happen annually. High-impact activities like hiking are a major contributor, thanks to the constant stress on rugged ground. It's a stark reminder of why being proactive about protecting your ankles is so important.
Honestly, most hikers can benefit from some form of ankle support, but the type of support you need can vary wildly. Someone taking a stroll on a well-maintained local path might be perfectly fine with the support built into a decent pair of mid-cut boots. On the other hand, a backpacker tackling a multi-day trek through a rocky mountain pass is going to need something much more substantial.
It's also important to see ankle support as just one piece of the puzzle. Looking into broader strategies for preventing sports injuries can help you build a complete safety system. When you combine ankle support with the right footwear, trekking poles, and good physical conditioning, you're setting yourself up for success. It’s not about weakness; it’s about hiking smarter.
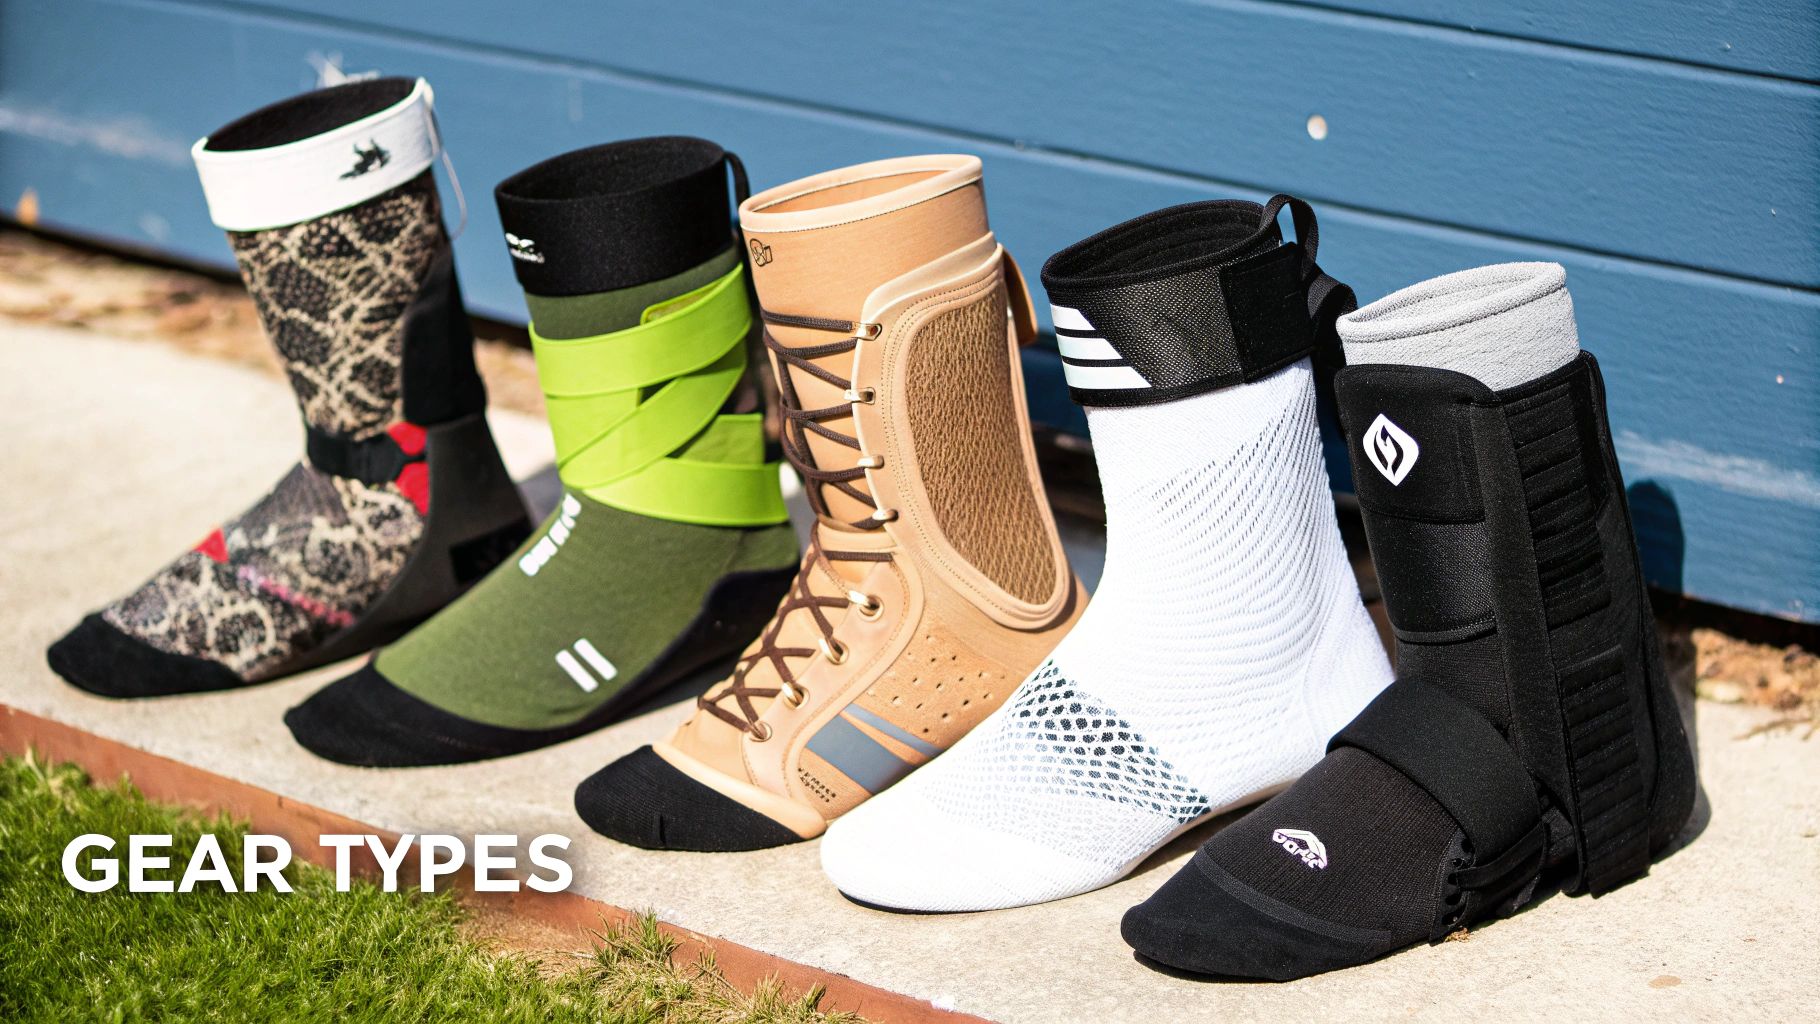
Figuring out the world of ankle support for hiking can feel like you're trying to read a map in the dark. There are so many options out there, it's easy to get turned around. The simplest way to break it all down is to split everything into two main camps: support that’s built right into your footwear and support that you add yourself.
Think of it like a car's safety features. Some cars have a super-strong, reinforced frame built right in (integrated support), while others might need an aftermarket roll cage for extreme off-roading (external support). They're both designed to keep you safe, but they get the job done in different ways. Let’s look at what this means for your feet out on the trail.
Your first line of defense comes directly from the design of your hiking boots. This built-in stability is created by a whole team of features working together to keep your foot locked in and secure. You don’t add these parts; you choose them when you pick out your boots.
The global demand for hiking boots is shaped by these design choices, with the market offering low, mid, and high-cut styles. Each one offers a different level of ankle support to handle specific kinds of hiking. This focus on protection shows just how important integrated support is for a safe hike on tricky terrain. You can dig deeper into these trends in this detailed hiking footwear market report.
Here are the key players when it comes to integrated support:
Sometimes, what's built into your boots just isn't enough. This is especially true if you have a history of ankle injuries, you're hauling a heavy pack, or you’re tackling seriously rugged trails. In these situations, external ankle support gives you an extra, targeted layer of protection.
These are pieces of gear you wear inside your boot, working directly with your ankle. They can range from offering gentle compression to providing almost complete immobilization.
"External ankle support is your specialized tool for the job. While your boot offers general stability, a brace provides precise reinforcement exactly where your ankle is most vulnerable, acting as a bodyguard for your ligaments."
Here’s a quick rundown of the most common types you’ll find:
The image below shows some of the data-backed benefits hikers get when they use the right ankle support.
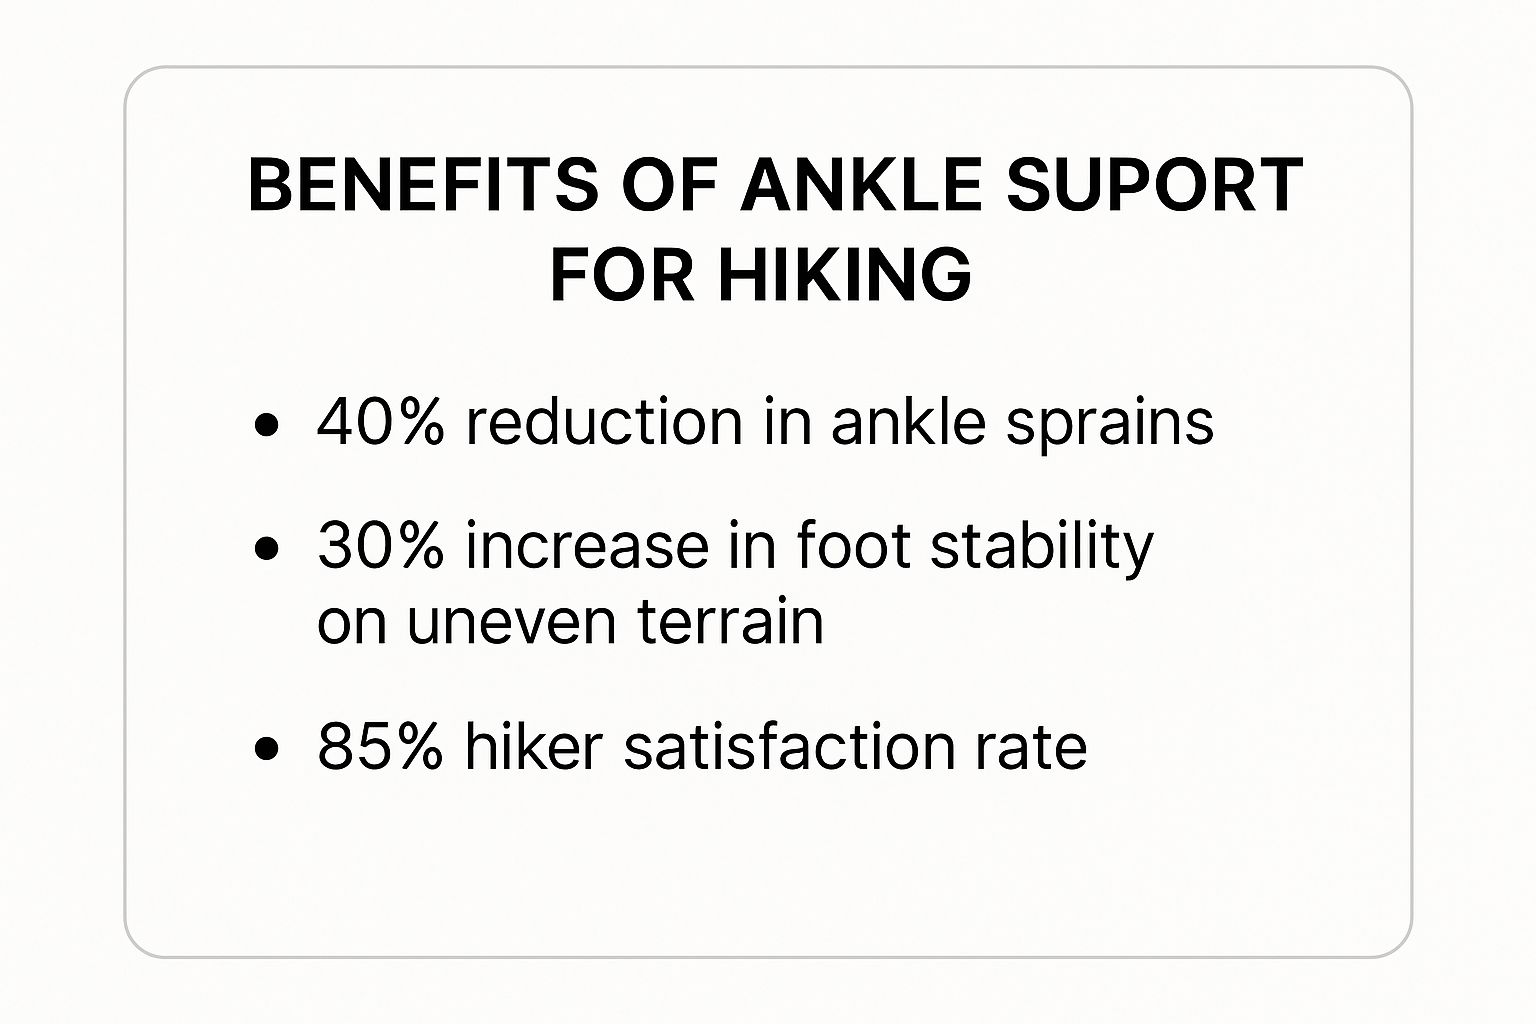
These numbers make it pretty clear: adding the right support can seriously cut your injury risk while improving your stability and how much you enjoy your time on the trail.
With all these choices, it helps to see them side-by-side. This table breaks down the different types of support to help you match the gear to your specific needs.
| Support Type | Primary Function | Best For | Support Level (1-5) |
|---|---|---|---|
| Integrated (Boot Design) | General stability, preventing twists on uneven ground. | All hikers; essential for moderate to rugged terrain. | 3 |
| Compression Sleeve | Reducing swelling, improving circulation, and providing minor support. | Mild ankle soreness, recovery, or light trail use. | 1 |
| Lace-Up Brace | Moderate to strong stabilization and mimics athletic taping. | Weak ankles, moderate terrain, post-injury support. | 4 |
| Semi-Rigid Brace | Maximum sprain prevention and restricts lateral movement. | Chronic instability, heavy packs, very rugged terrain. | 5 |
Ultimately, choosing the right ankle support for hiking comes down to you. A lightweight sleeve might be perfect for a day hike on rolling hills. But a semi-rigid brace is a must-have if you're tackling a multi-day mountain trek after a previous injury. Understanding what each type does best will help you make the right call for your next adventure.
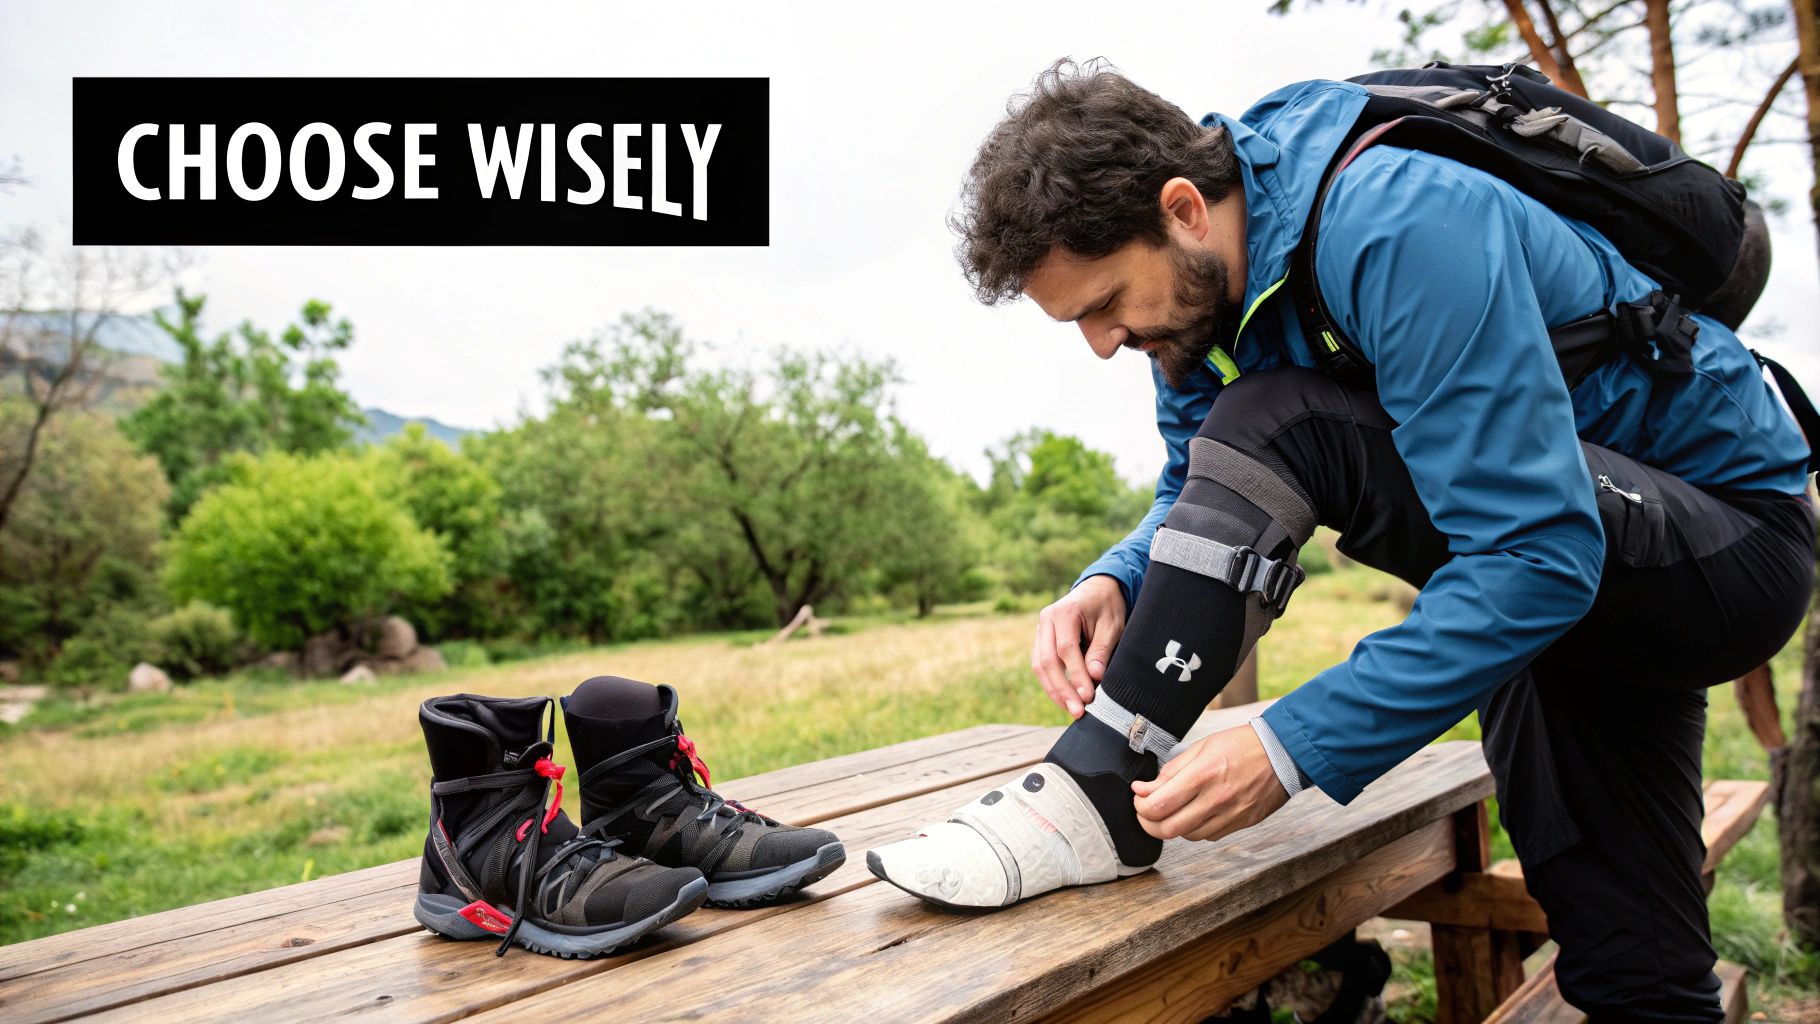
Picking the right ankle support isn't like grabbing a new water bottle off the shelf. It's a much more personal decision, and the best choice is a perfect match between you, the trail you're planning to tackle, and your body's history. When you think through these three key areas, you take the guesswork out of the equation and hit the trail with exactly what you need.
This isn't about finding the one "best" support out there. It’s about finding the most appropriate level of ankle support for hiking for your specific adventure.
Before you even glance at a trail map, you need to take stock of yourself. Your own body is the foundation for figuring out what you need. Think of it like setting up the suspension on a vehicle; a heavy-duty truck needs a totally different setup than a lightweight sports car, even if they're driving on the same road.
Start by asking yourself a few honest questions:
These factors give you a baseline. A strong, experienced hiker might get away with less support, while a newer hiker might want to be more proactive and choose a bit more.
Next up, you have to really analyze the hike itself. The gear you need for a mellow two-hour walk on a flat path is worlds away from what you’d need for a week-long trek through rugged mountains. Your support has to be up to the challenge of the terrain you've chosen.
A classic mistake is picking gear for a single "what-if" scenario. Instead, be realistic about the conditions you're most likely to face. Your ankle support needs to match the trail ahead, not some once-in-a-lifetime extreme situation.
Break down the hike with these questions:
Last but not least, you have to be brutally honest about your past. Your injury history is one of the biggest predictors of future problems, and trying to ignore it is a recipe for a painful, cut-short hike. In fact, this factor can often override the other two.
Even a strong, seasoned hiker on a moderate trail might need maximum support if they have a history of ankle trouble. Think about your past in two main categories:
If you have a history of sprains, you should seriously consider a lace-up or semi-rigid brace, even on easier trails. This kind of proactive approach helps prevent re-injury, which is often far worse than the first one. Making the right call here lets you hike with confidence, knowing your gear is perfectly dialed in for you and your adventure.
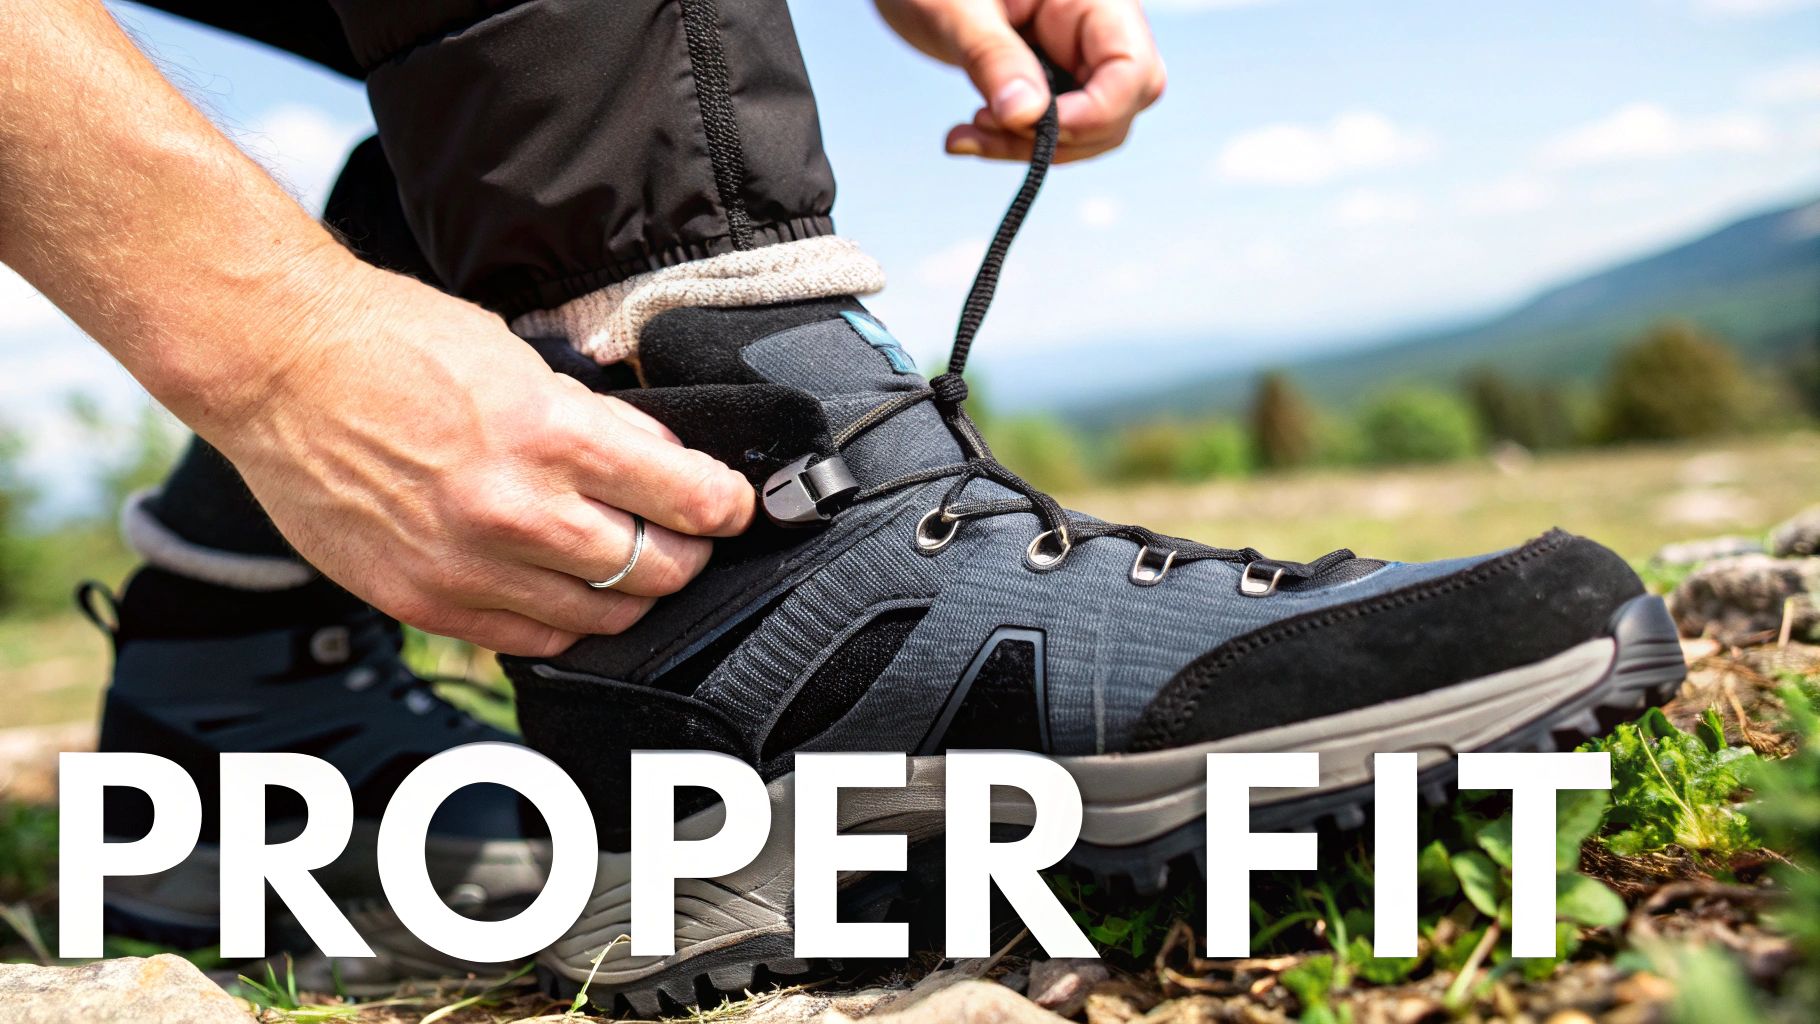
Here's the hard truth: even the most high-tech, expensive ankle support is totally useless if it doesn't fit right. A sloppy fit won't just fail to protect you; it can cause a whole host of new problems, from angry blisters and chafing to a false sense of security that might tempt you to push your limits.
Nailing that perfect, locked-in feel is a bit of a science, but it's one you can easily master. The goal is to create a single, stable system where your sock, brace, and boot work together in perfect harmony.
Your boots are the bedrock of your support system. Before you even think about slipping on an external brace, you absolutely have to ensure your primary footwear fits like it was made for you. Getting this right is completely non-negotiable for staying safe and comfortable on the trail.
A proper boot fit stops your foot from sliding around, which is enemy number one when it comes to preventing both blisters and ankle rolls. For a much deeper dive into this crucial first step, our complete hiking footwear guide on how to choose hiking boots lays out everything you need to know.
But for a quick check, here are the must-do steps:
Measure at the Right Time: Your feet swell throughout the day. Always try on new boots in the late afternoon or after you've been on your feet for a while to get the most accurate measurement.
Wear the Right Socks: Bring the actual hiking socks you'll be wearing on your adventures. A thick wool sock can make a boot feel a full size smaller compared to a thin gym sock.
Check the Length: Before you even touch the laces, slide your foot all the way forward until your toes tap the front of the boot. You should be able to slide one finger snugly between your heel and the back of the boot—no more, no less.
Lace Up and Walk: Cinch the boots down so they're snug, but not so tight you feel a pulse. Walk around the store, and if they have an incline ramp, use it. Your heel should feel completely locked in place with no slipping up and down.
If you're adding an external brace for extra ankle support for hiking, the fitting process gets another layer of detail. An ill-fitting brace can easily do more harm than good.
You're looking for the sweet spot between snug support and comfortable movement. The brace should feel like a firm, reassuring hug around your ankle joint, not a restrictive iron vise.
"A well-fitted brace should feel like an extension of your body, providing support without drawing attention to itself. If you're constantly aware of it pinching or rubbing, the fit is wrong."
Follow these steps to make sure your brace is trail-ready:
Any seasoned hiker knows a fundamental trail truth: your gear never works in isolation. Every single piece, from your boots to your backpack, is part of an interconnected system. Your ankle support for hiking is a perfect example of this. Its effectiveness is directly tied to the other gear you carry and how you use it.
When you start thinking in systems, you can dial in your entire setup for the best possible safety and efficiency. A supportive boot is a great start, but it becomes a real powerhouse when paired with the right tools. This mindset transforms your gear from a random collection of items into a high-performance support network for your body.
If there's one piece of gear that dramatically boosts your ankle support, it's a set of trekking poles. Think of them as a mobile support system that works in perfect harmony with your footwear. Every time you plant a pole, you create another point of contact with the ground, instantly making you more stable.
This simple act takes a surprising amount of stress off your lower body, especially on steep downhills where a rolled ankle is most likely to happen. Poles help you stay upright and maintain a more controlled, deliberate pace, reducing the jarring impacts that lead to fatigue and clumsy missteps. To really get into the weeds on this, you can explore the many benefits of trekking poles in our detailed guide.
By spreading the load across your arms and core, you're not just saving your knees—you're actively protecting your ankles with every single step you take.
Your boots and braces provide passive support by restricting unwanted movement, while trekking poles offer active support by giving you dynamic control over your balance. Together, they create a comprehensive safety net.
The way you pack your backpack has a direct, and often overlooked, impact on your ankle stability. A poorly packed bag with heavy items sloshing around can throw off your center of gravity in an instant. This forces your ankles to constantly overcorrect to keep you balanced—a perfect recipe for fatigue and a potential injury.
A well-balanced pack, on the other hand, promotes a stable and efficient gait. When the heaviest items are locked in close to your spine and centered in your back, your body can move more predictably. This consistency lets your ankles operate smoothly, drastically cutting the risk of a sudden, awkward twist.
Finally, you have to consider how your ankle support physically interacts with your other gear. An external brace, for instance, adds a bit of bulk around your ankle. This can change how your high-cut boots fit, and you might need a slightly wider model or a different lacing technique to avoid painful pressure points.
In the same way, the collar of your boot and the top of a brace can sometimes get in the way of certain gaiters. You may need to find a gaiter with a wider opening or an adjustable strap to make sure it can seal properly over your boot without bunching up.
By carefully thinking through these little interactions, you ensure every piece of your gear system works together seamlessly, giving you solid protection from the ground up.
Even after covering the basics, it's totally normal to have a few more questions rattling around. Let's dig into some of the most common worries and myths hikers have about ankle support. Getting these cleared up will help you hit the trail with way more confidence.
Think of this as the final piece of the puzzle, solidifying your understanding so you can keep your joints safe out there.
This is the big one, and it’s a perfectly valid concern. The idea is that if you rely on a brace, your own stabilizing muscles will get lazy and weaken over time.
While constant, everyday reliance on a super-rigid brace might lead to some muscle deconditioning, using ankle support specifically for hiking is a completely different ballgame. On the trail, that support isn't a crutch; it's a shield against sudden injuries from nasty roots, hidden rocks, and unexpected slips.
It's kind of like a seatbelt. You wear it for a high-risk activity (driving), but it doesn’t make you a worse driver. The benefit of preventing a serious injury far outweighs any tiny risk of muscle laziness from trail-specific use.
The smartest strategy is to pair on-trail support with off-trail strengthening exercises. This two-pronged approach builds your body’s natural stability while giving your ankles the backup they need when the terrain gets sketchy.
Figuring out if your boots are pulling their weight is your first step. It's your primary line of defense, and you can get a good sense of its effectiveness by checking three key things.
First, look at the collar height and stiffness. A solid mid or high-cut boot should have a padded collar that hugs your ankle bones securely. This creates a physical barrier that helps prevent your ankle from rolling.
Next, give it the old twist test. Grab the boot by the toe and heel and try to wring it out like a towel. A boot with good torsional rigidity, thanks to a quality internal shank, will resist that motion. That resistance is what keeps your foot stable when you land on an awkward, angled surface.
Finally, check the heel counter—that's the firm plastic insert reinforcing the heel. It should be solid and cup your heel tightly to stop it from slipping around. If your boots are super flexible and twist easily, they probably won't offer enough support on their own for tough trails. And remember, even the best boot is useless if it doesn't fit right, which is why it’s so important to how to break in hiking boots properly.
This one’s easy: for comfort, hygiene, and the best performance, you should almost always wear an ankle brace over a thin, moisture-wicking sock.
That sock is a critical barrier between your skin and the brace. It stops nasty chafing, prevents painful blisters, and helps manage sweat build-up inside your boot. Dry feet are happy feet.
It really depends on the brace. Many braces prescribed for recovering from a sprain, especially the semi-rigid or lace-up kind, are actually fantastic for hiking. They're built for maximum stability, after all.
However, some medical braces are a definite no-go. Those bulky, rigid "walking boots" you get for a fracture have no place on a trail. Similarly, a simple elastic compression sleeve from the pharmacy might feel nice, but it offers almost zero structural support for rugged terrain.
The best braces for hiking balance strong support with a low-profile design that fits inside your boot and is made from durable materials. If you already use a brace for a medical reason, have a quick chat with your physical therapist to make sure it's up to the unique demands of hiking.
At TREKOLOGY, we design gear like our high-performance trekking poles to work as part of your complete stability system, reducing joint impact and helping you hike with greater confidence. Explore our thoughtfully engineered equipment to support your next adventure. Visit https://trekology.com to gear up.
Leave a comment