Certified Business
With over 10,000 orders
With over 10,000 orders

Photo by Todd Diemer on Unsplash
Most people think camping season ends when the first snowflake falls. I'm here to tell you they're missing out on the best part.
Sure, the idea of sleeping outside when it’s freezing seems a little crazy. But snow camping offers an entirely different kind of outdoor experience—one defined by a profound quiet you just can't find in the summer, landscapes that look straight out of a fairy tale, and absolutely zero crowds.
With the right preparation and modern gear, this isn't about just surviving the cold. It's about thriving in a season most only see from their windows. This guide will show you exactly how to embrace it for an adventure you won't forget.

Photo by Dan Formsma on Unsplash
The usual hum of a busy campground? Gone. It’s replaced by a muffled silence, where the only sounds are the crunch of snow under your boots and the crisp winter wind. For a growing number of us, that's the ultimate escape.
This unique appeal is why snow camping has exploded in popularity. A 2023 survey found that 31.2% of campers now head out in the winter, a number that’s holding strong after a huge spike in recent years. It’s clear this isn't just a fad; it’s a lasting shift toward year-round adventure.
A trail you've hiked a dozen times in the summer becomes a whole new world under a blanket of snow. Everything transforms into a canvas of white and blue, with frost-covered trees gleaming in the low winter sun. It’s an otherworldly beauty that offers a completely fresh perspective on familiar places.
The profound solitude of a winter campsite is its greatest reward. You can experience popular destinations without the competition, giving you the freedom to fully immerse yourself in the environment.
Let's be real: successfully camping in snow takes more know-how than a summer trip. You have to refine your skills, from pitching a tent on a snowy base to managing your body temperature and nutrition. It’s a challenge, but one that builds serious confidence and makes you a more capable outdoorsperson in any season.
Getting your gear right is the first step, and our guide on essential tips for camping in winter is the perfect place to start.
Mastering these skills unlocks a whole new season of possibilities. Instead of stashing your gear in the closet for months, you can:

Photo by Raj Kumar Joshi on Unsplash
When you’re camping in the snow, your gear is more than just stuff you bring for comfort—it’s your lifeline. A forgotten piece of equipment on a summer trip might be an annoying inconvenience. But in the winter? The wrong gear can put you in a genuinely dangerous situation. Every single item in your pack has to be deliberately chosen to pull its weight in freezing, often wet, and always demanding conditions.
The good news is that the outdoor industry has really stepped up as more people have discovered the magic of year-round adventures. For instance, the global camping tent market was on track to blow past USD 3 billion by 2025, with a huge part of that growth coming from beefy four-season models built for exactly this kind of thing. You can actually read more about this market growth and the evolution of tent designs.
First things first: your tent. This is your primary defense against whatever the mountain throws at you, and a standard three-season tent just won't cut it. They’re designed for ventilation and keeping rain out, but their lightweight poles and mesh walls will get absolutely flattened by a heavy snow load or shredded by persistent, biting winds.
You need a true four-season tent. These are built differently from the ground up.
A four-season tent isn't a recommendation; it's a requirement for snow camping. It’s specifically engineered to handle the unique pressures of a winter environment, from the sheer weight of snow piling up overnight to the relentless force of alpine winds. It's what ensures you have a safe space when you need it most.
Of course, owning the right tent is only half the battle—setting it up correctly is just as critical. The process starts long before you even unroll the tent body.
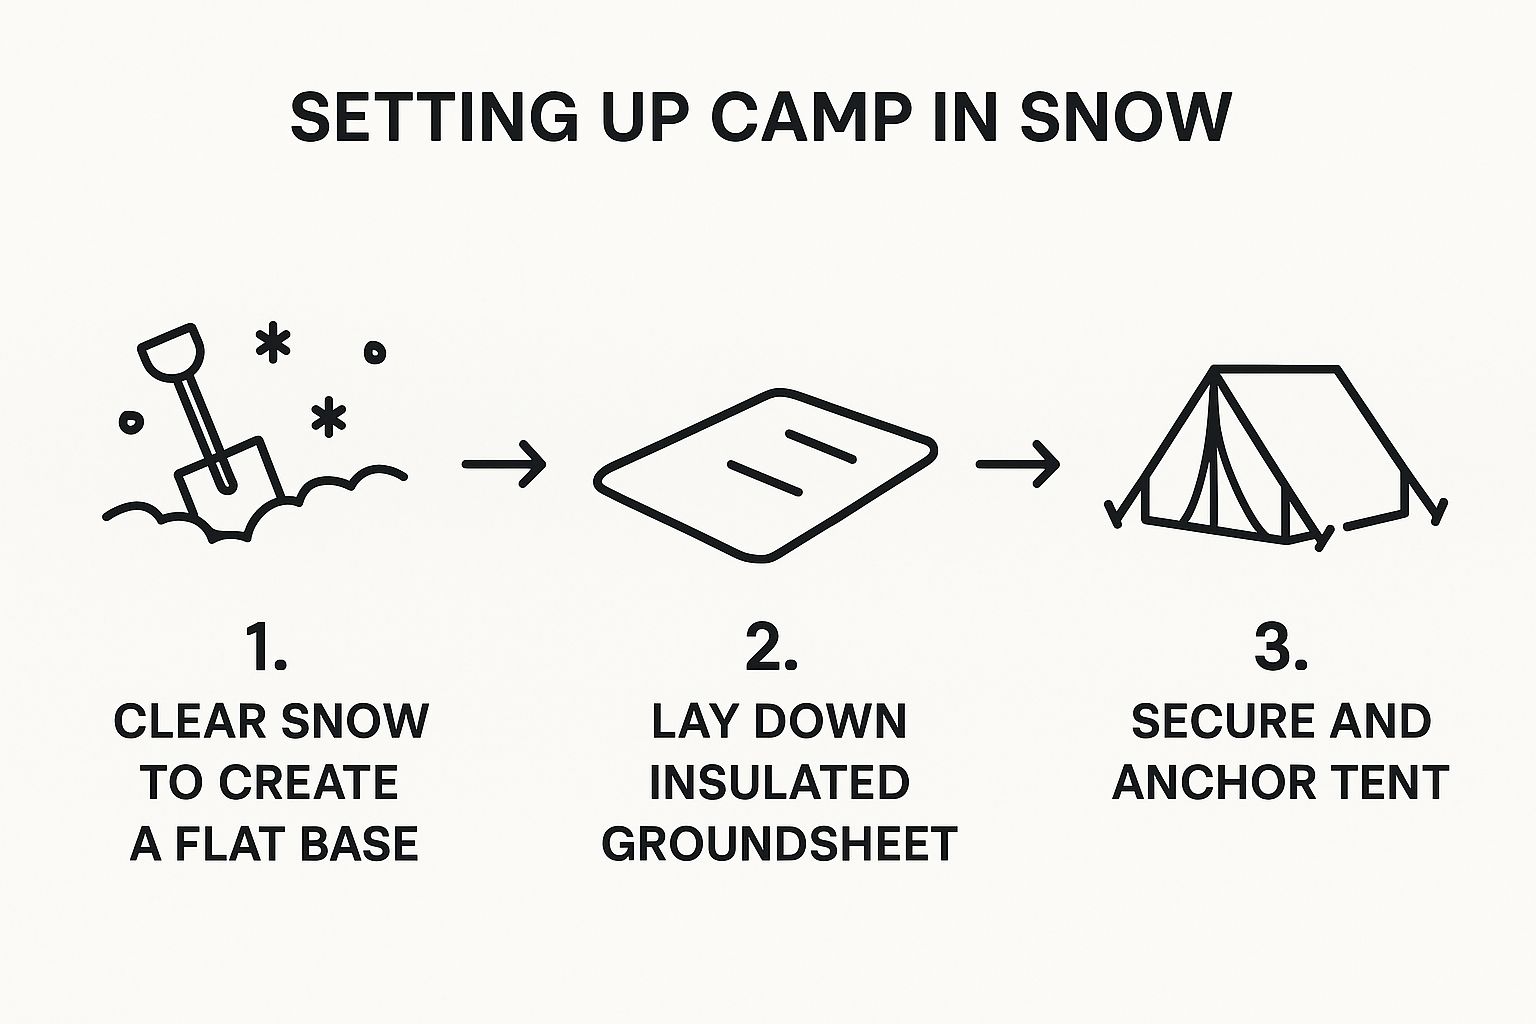
As you can see, the first real job is creating a stable, packed-down platform for your tent. Stomping out an area with your snowshoes or skis compacts the snow, preventing you from sinking and creating a much more insulated base to sleep on.
Once your shelter is secure, it’s your sleep system’s turn to keep you warm through the long, cold night. This isn't just one piece of gear; it's a team of two equally important players: your sleeping bag and your sleeping pad.
For your bag, you should be looking at something rated for 0°F (-18°C) or colder. And a word of caution here: a bag’s temperature rating indicates the lowest temperature at which an "average" person can survive the night, not sleep comfortably. A good rule of thumb is to pick a bag rated at least 10-15 degrees colder than the lowest temperature you actually expect to face.
The sleeping pad underneath you is just as crucial. The frozen ground is a massive heat sink, and it will suck the warmth right out of your body through a process called conduction. A pad’s ability to fight this heat loss is measured by its R-value. For snow camping, you need a combined R-value of 5 or higher. Many experienced winter campers achieve this by stacking two pads—a closed-cell foam pad on the bottom (for durability and foolproof insulation) and a comfier inflatable pad on top.
To make sense of it all, here's a quick checklist for your main shelter and sleep system components.
This table breaks down the must-haves for the gear that will keep you safe and warm overnight.
| Gear Item | Minimum Requirement | Pro Tip |
|---|---|---|
| Tent | True four-season rating with a full-coverage rainfly. | Practice setting it up at home with gloves on. Fumbling with frozen fingers in a storm is no fun. |
| Sleeping Bag | Rated 0°F (-18°C) or colder. Down or synthetic fill. | Store your bag in a waterproof compression sack to guarantee it stays dry, no matter what. A wet sleeping bag is useless. |
| Sleeping Pad(s) | Combined R-value of 5 or higher. | Use a closed-cell foam pad underneath an inflatable one. The foam adds insulation and acts as a backup if your air mattress fails. |
| Stakes/Anchors | Snow-specific stakes, deadman anchors, or stuff sacks. | Standard tent pegs are useless in snow. Burying stuff sacks filled with snow works great as a "deadman" anchor in deep powder. |
Getting these four items right is the foundation of a successful and safe winter camping experience.
With your shelter and sleep system dialed in, a few other pieces of gear need a winter-specific upgrade.
Your stove is a big one. Standard isobutane canister stoves can lose pressure and sputter out in the cold. The undisputed champ for winter is a liquid fuel stove (the kind that runs on white gas). They perform reliably no matter how far the temperature drops, which is critical when you're counting on it to melt snow for drinking water.
For navigation, your phone is a backup, not a primary tool. Cold drains batteries in a flash. Always, always carry a physical map of the area and a compass, and know how to use them. A dedicated GPS device with lithium batteries is a great addition, as lithium chemistry holds up much better in freezing conditions.
Finally, remember that your clothing is your mobile shelter. The layering system is king here—think moisture-wicking base layers, insulating mid-layers, and a waterproof/windproof shell. And the golden rule? Absolutely no cotton. It absorbs moisture, loses all insulating properties when wet, and can quickly lead to hypothermia. Stick to wool or synthetics from your socks to your hat.

Photo by Koushik Roy on Unsplash
In the summer, picking a bad spot might just mean a lumpy night's sleep. But when you're camping in the snow, a poor site selection can be downright dangerous. The first step, before you even think about unpacking, is to read the landscape with a critical eye, scanning for natural protection and potential hazards.
Your best bet is a location that’s sheltered from the wind. Look for a cluster of sturdy trees or the leeward side of a small hill. You'll want to avoid camping directly at the bottom of steep slopes or in gullies, as these can be prime avalanche paths. It's also worth remembering that cold air is dense and sinks, so those valley bottoms are often the absolute coldest spots around.
And don't forget to look up. You'll hear experienced campers talk about “widowmakers”— and they’re called that for a reason. These are the dead, hanging branches that could come crashing down with a sudden gust of wind or the weight of melting snow. Steer clear of any trees that look unhealthy or are sagging under a heavy snow load.
Once you've scouted a safe area, your first real job is to build a solid foundation for your tent. You can’t just pitch it on loose, powdery snow; it offers terrible insulation and will shift under your weight all night. You need to create a firm, level platform by compressing the snow.
Get to work with your snowshoes or skis, stomping down an area that's slightly larger than your tent's footprint. This process, known as sintering, helps the snow crystals bond together, creating a much stronger and more insulated surface. It can take a surprising amount of time and energy, but it's a non-negotiable step for a comfortable night.
Packing down the snow is the single most important step in site preparation. It prevents you from sinking, creates a warmer surface to sleep on, and provides a stable base for your tent anchors. Don't rush this part.
After you've packed the snow down, you need to let it set for at least 30 minutes. This allows the compacted snow to harden into a solid slab. While you wait, you can start gathering snow to build wind walls or get your cooking area prepped. A well-prepared base is the first layer of insulation, but for more tips, you can learn how to insulate a tent for winter camping.

Photo by Wolfgang Lutz on Unsplash
With your platform ready, it’s time to orient your shelter. Position your tent so the door faces away from the prevailing wind. If you can, angle it to catch the first rays of the morning sun. That little bit of solar warmth makes getting out of your sleeping bag a whole lot more pleasant.
Building a snow wall is another fantastic way to create a windbreak. It's not as hard as it sounds:
Finally, think about your camp layout. Designate separate zones for your kitchen and your bathroom. I like to dig a small pit for my stove to keep it shielded from the wind. Your bathroom area should always be at least 200 feet away from your campsite and any water sources to follow Leave No Trace principles. A little organization goes a long way toward a safe and efficient camp.

Photo by Gaurav Pikale on Unsplash
Success when you're camping in the snow really boils down to managing your energy. It's a simple formula: stay warm to conserve calories and eat well to get them back. Think of your body as a furnace that has to work overtime just to maintain its core temperature in the cold.
This unique challenge is actually attracting more adventurers than you might think. Recent data shows a huge jump in winter camping interest, with a potential 65% of campers now considering cold-season trips. It seems more and more of us want to experience the outdoors all year round. You can get the full scoop on this trend over at Modern Campground.
You've heard the "wear layers" advice a million times, but the real trick is knowing why it works. Each layer has a specific job, and together they trap air (which is the real insulator) and manage moisture. Getting this system right is the difference between being comfortable and being miserable.
The key is to manage these layers actively. If you start to sweat while snowshoeing up a hill, take off your mid-layer. The moment you stop for a break, put it right back on before you start to feel a chill. Remember: staying dry is staying warm.
Beyond just your clothes, you have to be proactive about generating and holding onto heat. Don't just sit there and endure the cold; fight back with a few smart tactics.
One of the oldest tricks in the book is to make your own hot water bottle. Before you get ready for bed, boil some water and pour it into a tough, leak-proof bottle like a Nalgene. Seal it up tight and toss it into your sleeping bag about 30 minutes before you climb in. It’ll pre-warm the space beautifully and can provide a surprising amount of warmth for hours.
A classic mistake is going to bed cold. If you're already shivering when you get in your sleeping bag, you're starting with a massive heat deficit that's hard to overcome. Do 20-30 jumping jacks or a few quick push-ups right before you get in to spike your core temperature.
That quick burst of activity creates a wave of body heat that your sleeping bag can then trap, setting you up for a much more comfortable night.
Your body burns a shocking number of calories just trying to stay warm. You have to constantly refuel with high-energy foods that are easy to make in the cold. This is the time for high-fat and high-protein meals.
Even if you're a seasoned summer backpacker, snow camping is a whole different ball game. The margin for error shrinks dramatically when the temperatures plummet, and small oversights can quickly morph into serious problems.
Learning from the common pitfalls isn't just a good idea—it's your final, and most important, safety check before you even think about hitting the trail.
The most common mistake? Simply underestimating how bone-chillingly cold it can get. A forecast of 20°F (-7°C) might not sound apocalyptic, but that single number doesn't tell the whole story. It doesn't account for wind chill, or the cumulative effect of being exposed for 24 hours straight.
This leads people to bring gear that isn't quite up to the task, like a 20-degree sleeping bag or a flimsy three-season tent. Trust me, that's a recipe for a dangerously cold, miserable, and sleepless night.
One of the biggest threats in winter camping doesn't come from falling snow, but from your own sweat. It sounds logical to bundle up before you start hiking or setting up camp, but this almost always leads to overheating and perspiration.
The moment you stop moving, that sweat cools down and starts to freeze. It will suck warmth from your body at an alarming rate.
This is exactly why active layering is so critical. You should actually start your hike feeling a little cool. Your body will generate plenty of heat once you get going, I promise.
Another rookie error is forgetting to ventilate your tent. As you breathe overnight, you release a surprising amount of water vapor. Without any airflow, this vapor hits the cold tent walls, condenses, and then freezes. You'll wake up to a layer of frost on the inside of your tent, ready to "snow" all over you and your gear with the slightest bump.
Always crack a tent vent, even when it feels completely counterintuitive in the freezing cold. Proper ventilation is the only way to combat interior condensation, keeping you and your sleeping bag dry and effective.
Simple tasks you take for granted in the summer become surprisingly difficult in the cold. Neglecting them can have some pretty big consequences.
Avoiding these mistakes really just comes down to thoughtful preparation. Bringing family along adds another layer of planning, but our guide on how to enjoy winter camping with kids offers great tips for a successful trip.
Even the most seasoned backpacker has a few lingering questions before their first snow camping trip. These are the little details, the "what ifs" that can make or break your comfort and confidence once you're out there.
Think of this as the final mental checklist. Getting these things right means you can focus on the sheer magic of a winter wonderland, not on nagging logistical problems.
Let's just get this one out of the way, because it's easily one of the most common—and critical—questions. The short answer is you follow Leave No Trace principles, but they look a little different when everything is frozen solid.
For pee, it's pretty simple. Walk at least 200 feet (about 70 big steps) away from your camp, any trails, and any water sources. The idea is to disperse it where it won't be a problem for others.
Solid waste is a whole different ball game. The ground is frozen, so digging a proper cathole is out of the question. More importantly, waste doesn't decompose in the cold. It just gets preserved. That means you absolutely have to pack it out. The best way to do this is with a commercial WAG bag or a similar portable toilet system. It’s the only responsible way to handle things in the snow.
Leaving solid waste behind is a hard no. It contaminates the area for everyone else and the local wildlife, and it’ll be a nasty surprise for someone when the spring thaw hits. Always, always pack it out.
This is a big one. Your sleeping bag is your lifeline to a safe, warm night's sleep. As a starting point for snow camping, you should be looking for a bag rated to at least 0°F (-18°C). But don't take that number at face value.
A bag's temperature rating usually indicates the lowest temperature at which you can survive, not the temperature at which you'll be toasty warm. A much smarter approach is to choose a bag rated 10 to 15 degrees colder than the lowest temperature you actually expect to face. This gives you a crucial buffer.
And remember, even the world's best sleeping bag is useless without good insulation underneath you. You have to pair it with a sleeping pad that has a high R-value (which measures thermal resistance). For winter, you need a combined R-value of 5 or higher to stop the cold from seeping up from the frozen ground and stealing all your body heat.
Probably not. That trusty isobutane/propane stove you love for summer backpacking will likely let you down in the cold. As temperatures drop, the fuel canisters lose pressure and can stop working entirely. The last thing you want is to be stuck with no way to melt snow for drinking water—that's a genuinely dangerous spot to be in.
The gold standard for winter camping is a liquid fuel stove, which usually runs on white gas. You pressurize them manually with a pump, so they perform flawlessly no matter how frigid it gets.
If you absolutely must use a canister stove, you need a plan B:
At TREKOLOGY, we believe the right gear empowers you to explore confidently in any season. From supportive trekking poles for snowy trails to ultralight pillows that guarantee a good night's rest, our thoughtfully engineered equipment is designed to make your winter adventures safer and more comfortable. Explore our collection at https://trekology.com and get ready for your next trip.
Leave a comment