Certified Business
With over 10,000 orders
With over 10,000 orders

Photo by David Schultz on Unsplash
Keeping your tent warm isn't just about piling on more blankets. It’s about understanding how you lose heat in the first place and building a smart defense against the cold. Once you get a handle on this, you'll see your gear in a whole new light.
Think of your body as a personal furnace, cranking out heat all night long. The cold, unforgiving environment wants to steal every bit of that warmth. It does this in three main ways, and if you can learn to outsmart them, you’ll stay toasty no matter how low the temperature drops.
The biggest and most relentless enemy is conduction. This is heat loss from direct contact. When you lie down, the cold ground acts like a massive heat sink, literally sucking the warmth right out of your body. It's the reason you can feel frozen in a top-of-the-line sleeping bag if you've skimped on what's underneath you.
Next up is convection, which is just a fancy term for heat loss caused by moving air. That cold breeze whistling through your tent isn't just noisy; it’s actively stripping warmth from your body. Even the air circulating inside your tent can carry your precious heat away. Every time your tent walls shudder from a gust, you're losing the fight.
Finally, there's radiation. Your body is constantly radiating heat outward, like invisible waves of energy. Inside a big, uninsulated tent, that heat just floats away into the cold, empty space. It’s a slow, silent drain on your internal furnace.
So, how do we use this knowledge? It’s not about brute force; it's about strategy. You need to fight each type of heat loss with the right tool.
When you tackle all three types of heat loss, you stop simply surviving the night and start actually enjoying yourself. You’re building a complete system where every piece of gear has a specific job to do.
This isn't just boring science—it's the key to unlocking comfortable camping in any season. It gives you the power to look at your campsite and gear not as a random collection of stuff, but as a dynamic system you can control to stay warm and happy.
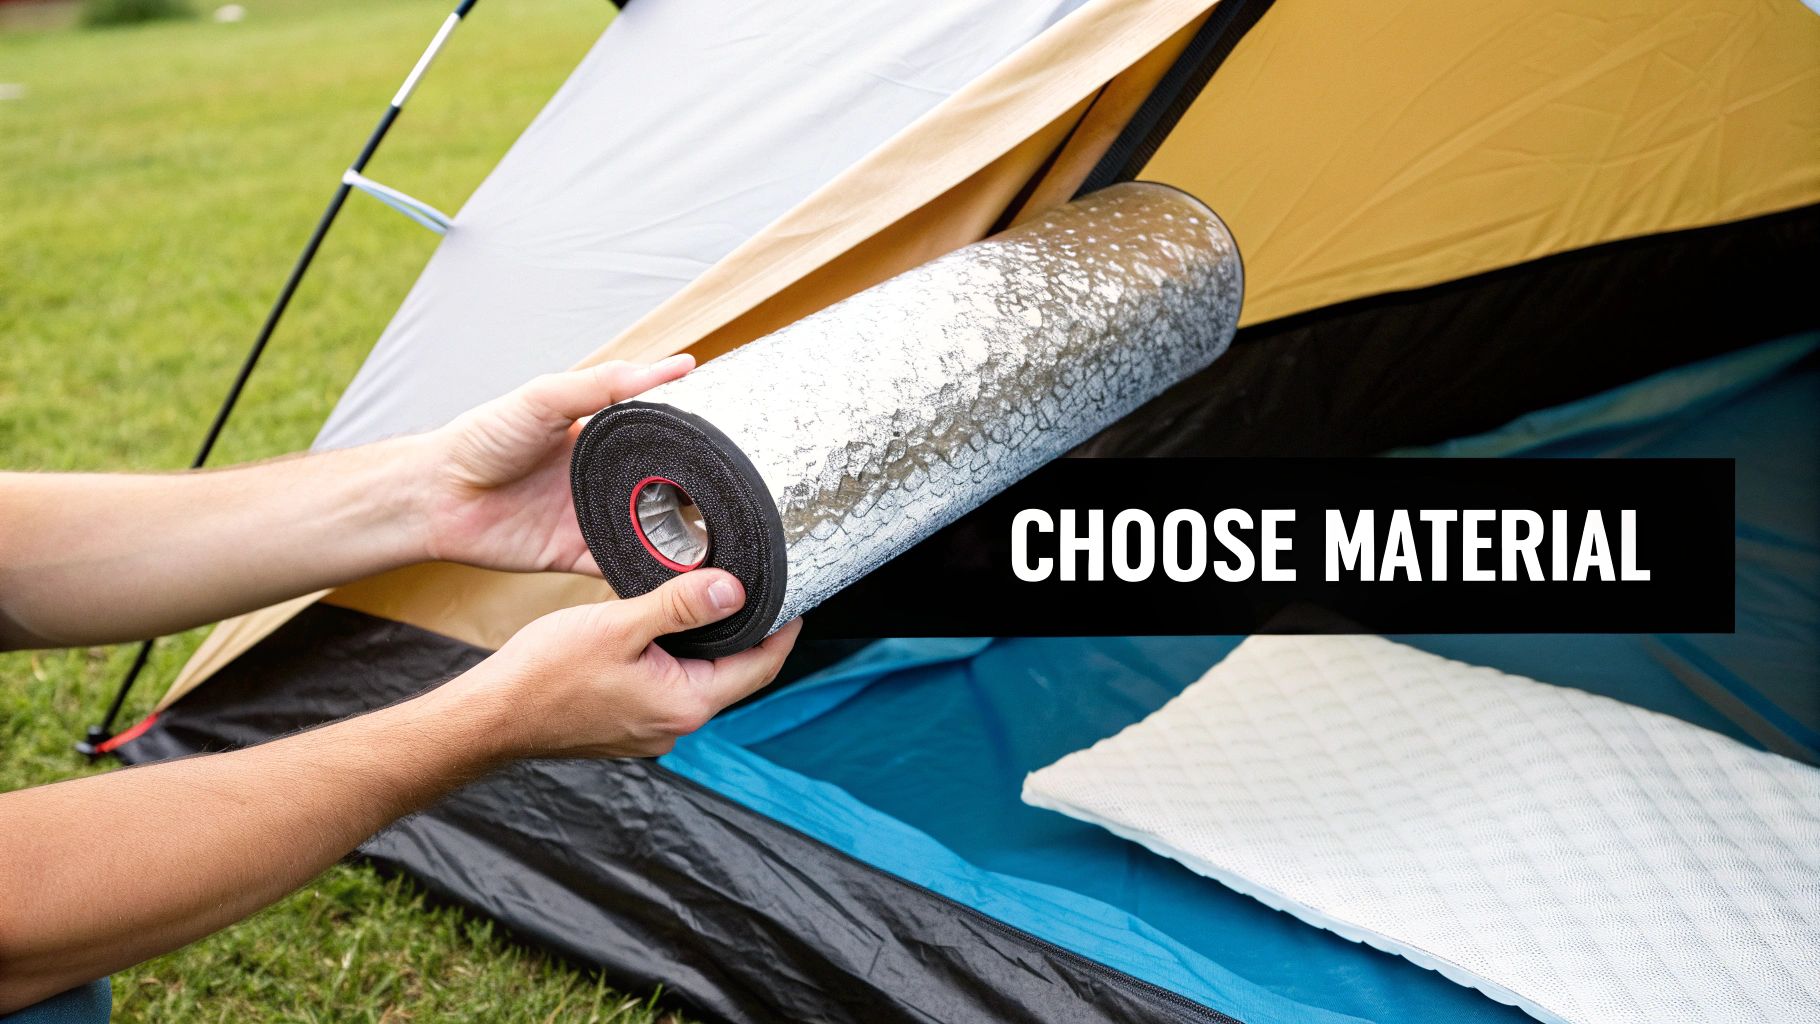
Let's get one thing straight: the cold, hard ground is your biggest enemy when you're trying to stay warm in a tent. It's a relentless heat vampire, constantly sucking warmth from your body through conduction. Forget everything else for a moment. Building a solid thermal barrier on your tent floor is the single most effective thing you can do. This isn't just about tossing a mat down; it's about building a smart, strategic layering system.
Your first line of defense goes down before you even pitch the tent. A simple ground tarp or footprint is non-negotiable. Placed directly on the snow or cold earth, its main job is to shield your tent floor from sticks and rocks, but more importantly, it blocks ground moisture from seeping in. A damp tent floor is a cold tent floor. End of story.
Okay, with the tent up, the real insulation work begins inside. The goal here is to create a series of layers that each do a specific job, all working together to stop that precious heat from escaping. It's a lot like dressing for the cold—sure, one big jacket is okay, but several thinner, specialized layers are far better.
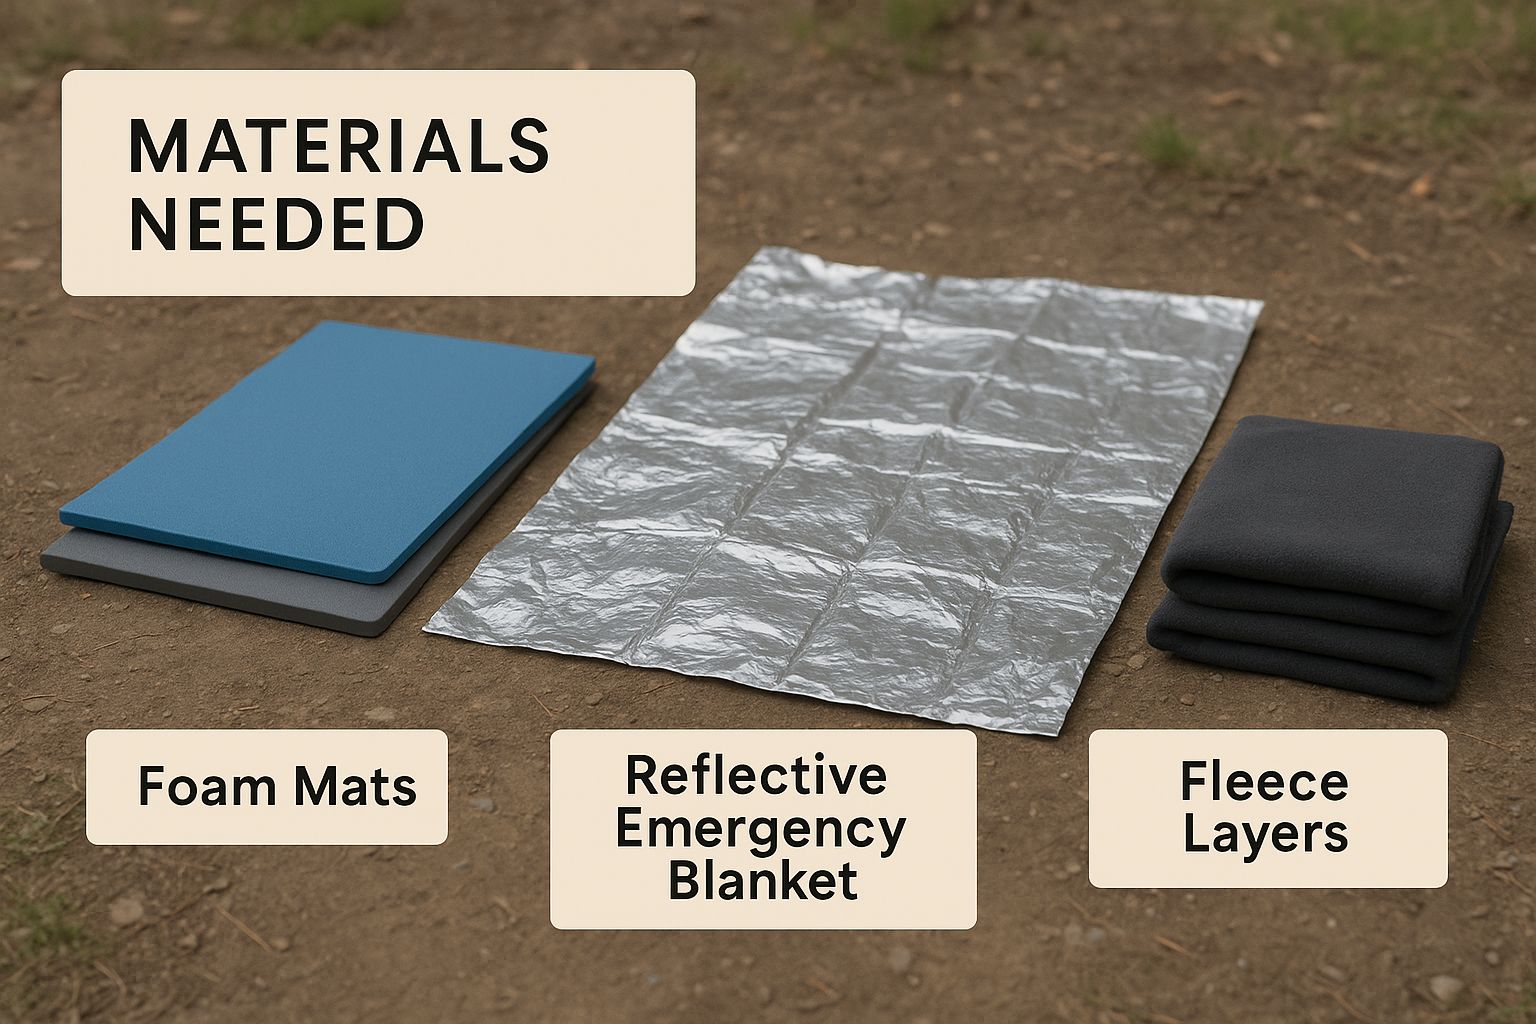
Start with a reflective material as your first layer inside the tent. A cheap and feather-light Mylar emergency blanket is perfect for this. Spread it out so it covers as much of the floor as possible. Its job isn't about comfort; it's about physics. This layer reflects your body's radiant heat right back up at you.
I see this mistake all the time: people put the reflective blanket under their main sleeping pad. To work its magic, it needs an air gap. The most effective placement is directly beneath your sleeping bag, right on top of your sleeping pad.
Next up is the real workhorse of your floor system: closed-cell foam pads. These things are incredible. They're non-absorbent and packed with thousands of tiny trapped air pockets that dramatically slow down conductive heat loss. This is your primary barrier against the cold ground.
This setup, combining the right materials in the right order, is what separates a comfortable night from a miserable one.
For decades, seasoned campers have sworn by materials like Mylar, which can bounce back up to 90% of your body heat. When you pair that with a closed-cell foam pad, which typically has an R-value (that's the measure of thermal resistance) between 1.5 and 3.5, you create an incredibly effective duo. Combining reflective and foam insulation can slash heat loss through the ground by 40-60%. That’s a game-changer for both comfort and safety. The market for these high-performance materials is always growing, and you can learn more about insulation trends on sites like imarcgroup.com.
To help you visualize how this all comes together, here’s a breakdown of the layers from the ground up.
| Layer (From Ground Up) | Material Example | Primary Purpose | Effectiveness |
|---|---|---|---|
| Ground Layer | Ground Tarp / Footprint | Moisture barrier, puncture protection | Crucial for preventing dampness |
| Base Insulation | Closed-Cell Foam Pad | Stops conductive heat loss to the ground | High (Core of the system) |
| Comfort Layer | Inflatable Sleeping Pad | Comfort, additional insulation | Varies (check R-value) |
| Reflective Layer | Mylar Emergency Blanket | Reflects radiant body heat | High (when placed correctly) |
| Top Comfort Layer | Fleece Blanket / Foam Tiles | Adds warmth, feels cozy | Moderate (Improves comfort) |
Building your floor like this creates a multi-faceted defense system that addresses every type of heat loss.
Finally, for that extra touch of luxury, you can add your main inflatable sleeping pad on top of the foam. And if you really want to make it cozy, an old fleece blanket or even some interlocking foam puzzle mats (the kind used in kids' playrooms) can act as a final "carpet." This last step adds one more buffer and makes the floor much more pleasant to kneel or move around on. Just a pro tip: use a little duct tape or tuck the corners under your gear to keep the layers from sliding around. A shifting foundation can create cold spots, and you want your thermal barrier to stay right where you built it.
Once you've got the floor insulated, it's time to tackle the walls and ceiling. Your body is a little furnace, constantly radiating heat. In a normal tent, all that precious warmth goes right through the thin fabric and disappears into the cold night air. The goal here is to stop that from happening by lining the inside of your tent to reflect that heat right back at you.
You're essentially turning your tent into a personal thermal cocoon.
The classic, most effective, and cheapest way to do this is with Mylar emergency blankets. There's a reason every survival kit has one. They're feather-light and ridiculously good at bouncing radiant heat. Think of it as wallpapering your tent with mirrors, but for warmth instead of light.
The trick is getting these shiny layers up on the inner walls without tearing your tent fabric. You actually want a small air gap between the Mylar and the tent wall—that trapped air acts as another surprisingly effective layer of insulation. The good news is, you don't need a specialized toolkit for this.
A few everyday items will do the job perfectly:
I always start by lining the walls right around my sleeping area first. You don't have to cover every single inch of the tent. Just focus on the space where you'll be spending most of your time to get the biggest bang for your buck.
A rookie mistake I see all the time is people forgetting the ceiling. Heat rises, and an unbelievable amount of warmth escapes straight up through the roof. Draping a reflective blanket across the ceiling, clipped to the poles, is a total game-changer for staying warm.
While Mylar is my go-to, it’s not the only option. If you want something a bit more durable, check out the reflective bubble wrap insulation they sell at hardware stores. This stuff combines the shiny foil surface with the insulating power of trapped air pockets, making it a real powerhouse.
And if you're not the DIY type, you can always look for commercial tent quilts or insulation kits. These are made to fit specific tent models and attach with simple toggles, so you get a perfect, hassle-free fit. They cost more, of course, but the convenience and performance are top-notch.
By lining your walls and ceiling, you’ve now created a complete thermal envelope. The heat you produce will finally stay where it belongs—inside the tent, with you.

You can spend all day lining your tent with the best insulation, but if you ignore wind and moisture, you're going to have a bad time. All that effort will be for nothing once your shelter gets damp or starts flapping like a flag in a hurricane. Staying truly warm is about controlling your entire micro-environment, and that means tackling the two biggest fun-killers out there: wind and condensation.
I’ve seen it happen. A perfectly good setup turned into a cold, miserable night because these two factors were overlooked. Your first line of defense actually starts before you even unpack. Take a minute to scout your location. Look for natural windbreaks—a thicket of trees, a protective boulder, even a small dip in the terrain. Pitching in the lee of these features makes a world of difference. Always, and I mean always, point the narrowest part of your tent into the wind. It's a small detail that drastically cuts down on the surface area getting blasted.
Once your tent is up, that rainfly isn't just for rain. It's an absolutely essential piece of your warmth puzzle. Think of it like a double-pane window for your tent. When you stake it out properly, leaving a few inches of space between the fly and the inner tent, you create a pocket of still air. This buffer is your secret weapon against biting winds and convective heat loss.
A floppy, loose rainfly isn't just ineffective; it's a liability. When it sags and touches the inner tent, it acts as a direct bridge, transferring cold right into your living space. Get those guylines tight. A taut fly not only insulates better but also makes your tent vastly more stable when the wind picks up.
The concept is simple but incredibly effective. Modern double-wall tents are designed around this principle, creating an insulating air gap that can provide an R-value of around 0.9 in cold conditions.
While wind is the enemy on the outside, condensation is the sneaky saboteur on the inside. Every single breath you take releases warm, moist air. When that air hits the cold fabric of your tent wall or rainfly, it turns back into water. Those drips can soak your sleeping bag, your gear, and all that insulation you so carefully installed. Ironically, a well-insulated tent can sometimes make this worse by trapping more of that moisture.
The answer? Ventilation. Yes, even when it's freezing. It feels completely wrong to invite cold air in, but you have to give that damp air a way out.
Here’s how I manage it out in the field:
Getting the hang of managing wind and moisture is a skill that separates comfortable winter campers from miserable ones. If you're looking to dive deeper, these 6 essential tips for camping in winter are a great resource for mastering your cold-weather game.
So, you’ve nailed the basics and are ready to tackle genuinely cold weather. Or maybe you just want a cozier setup for your winter trips. This is where we go beyond simple DIY fixes and start looking at specialized gear and smarter strategies. It’s the difference between modifying a three-season tent and creating a true cold-weather fortress.
You’ll find a growing market for dedicated insulated tents, which often come with built-in quilted linings. Think of it as a pre-made thermal barrier that fits perfectly right out of the bag. No more messing with clips or magnets—these systems offer a seamless layer of insulation that’s a real step up from any patchwork solution you could rig yourself. The difference in warmth is something you can feel immediately.
So, should you spring for a commercial kit or stick with a DIY approach? It really comes down to a classic trade-off: cost versus convenience and performance. A custom-fit insulated liner is definitely an investment, but it can turn a standard tent into a legitimate winter shelter.
It helps that the technology is getting better all the time. The global insulation market is projected to swell to USD 86.7 billion, and a lot of that innovation in building materials is trickling down to outdoor gear. We're seeing new synthetic fabrics and multi-layer composites that can slash heat loss by up to 50%. This is great news for all of us, because it means both commercial kits and the materials we use for DIY projects are getting more effective every year.
Here’s a quick look at how the two approaches stack up.
Choosing between a DIY setup and a commercial kit depends on your budget, how much time you're willing to invest, and the level of performance you need. DIY gives you control and saves money, while commercial kits offer convenience and optimized performance.
| Feature | DIY Insulation (e.g., Mylar, Foam) | Commercial Tent Insulation Kits |
|---|---|---|
| Cost | Low initial cost; uses affordable, everyday materials. | Higher upfront investment. |
| Effectiveness | Good, but can be inconsistent with gaps and cold spots. | Excellent; designed for a perfect fit, providing uniform warmth. |
| Convenience | Requires time and effort to measure, cut, and fit. | Quick and easy to install; designed for your specific tent model. |
| Durability | Varies; materials like Mylar can be fragile. | Made from durable, high-quality textiles designed for outdoor use. |
| Portability | It can be bulky and awkward to pack. | Packs down relatively small and comes with its own storage bag. |
Ultimately, there's no single "best" answer. Your choice depends on your personal camping style and priorities. A well-executed DIY job can be surprisingly effective, but for plug-and-play warmth, a commercial kit is hard to beat.
Pro Tip: One of my favorite advanced tricks is the "double tent" method. Pitch a small, lightweight tent inside a larger, more robust one. You create a huge pocket of insulating air between the two, and the micro-climate inside the smaller tent becomes incredibly easy to heat and keep warm. It’s a game-changer in extreme cold.
Think beyond just the tent walls and consider your entire sleep system. For those who need maximum warmth, a supplemental heat source might be the answer. But a huge word of caution here: safety comes first. You absolutely must use a heater specifically rated for indoor or tent use, and you need to ensure there’s proper ventilation to prevent carbon monoxide buildup. If you’re considering this, check out this guide on how to pick a portable diesel heater to understand the options.
Finally, don’t forget that high-end gear needs proper care to perform its best. A clean, well-maintained tent will last longer and keep you warmer, protecting your investment. For a full rundown, check out our guide on how to clean and repair a tent.
Advanced winter camping is all about building a system where every piece of gear works together to keep you warm, safe, and comfortable, no matter what the weather throws at you.
Even with the best game plan, questions always come up when you're trying to stay warm in a tent. Getting the little details right is often what separates a cozy night's sleep from a miserable, shivery one. Let’s walk through some of the most common questions I hear from fellow campers to make sure you're set up for a warm, dry, and safe trip.
Yes, it absolutely can, but maybe not in the way you think. A tarp's main job here isn't direct insulation, but rather to serve as a killer windbreak and a second line of defense against rain or snow. By blocking the wind, you drastically cut down on convective heat loss—that's the heat that wind literally rips away from your tent's surface. And of course, keeping your tent bone-dry is non-negotiable, since wet gear is useless for insulation.
The real magic happens when you create a layer of still air between the tarp and your tent.
To get this right, you have to leave a gap of at least a few inches. Never just throw the tarp directly on top of your tent. Instead, use some nearby trees or your trekking poles to rig a taught A-frame or lean-to shelter above the tent. You want enough space for air to get trapped. That trapped air is a surprisingly effective insulator.
This simple setup gives you a serious shield against the elements and can make a real difference in how warm it feels inside.
This is a big one, and the answer requires some serious attention to detail. Yes, you can, but only with the right kind of heater and by following strict safety rules. You absolutely must use a heater that is specifically designed and certified for indoor or tent use. These models have critical safety features built in, like low-oxygen sensors and automatic shut-offs if they get tipped over.
I can't stress this enough: never, ever use an outdoor-only propane heater inside your tent. The risk of carbon monoxide (CO) poisoning is incredibly high and can be fatal.
Even when you have a tent-safe heater, these rules are not suggestions:
Good insulation makes your heater way more efficient, so you won't need to run it as long to get things toasty. But remember, insulation doesn't eliminate the safety risks.
Nope. In fact, if you're not careful, it can make it worse. Think about it: a well-insulated tent is great at trapping the warm, moist air you breathe out all night. When that humid air touches the cold outer fabric of your tent, that moisture condenses into water droplets. Hello, indoor rain.
The key is finding the perfect balance between insulation and ventilation.
You have to give that damp air an escape route. It’s why even on the coldest nights, you must keep your vents open. Cracking a roof vent and a small section of a window on the downwind side of the tent creates a natural chimney effect. It pulls the moist air out without creating a bone-chilling draft. Managing moisture is a core camping skill, especially when you're learning how to enjoy winter camping with kids, because more people mean a lot more moisture.
This is where a double-wall tent really shines, as it's designed specifically to channel condensation to the outer rainfly, keeping your living space dry.
At TREKOLOGY, we design gear to make every outdoor adventure more comfortable and accessible. From our ultralight sleeping pads that provide critical ground insulation to our compact tables and chairs that make camp life easier, we have the thoughtfully engineered equipment you need to stay warm and rejuvenated. Discover our full lineup and get ready for your next trip at https://trekology.com.
Leave a comment