Certified Business
With over 10,000 orders
With over 10,000 orders

Venturing into ultralight backpacking is about embracing a new mindset, one where efficiency and freedom redefine your connection with the outdoors. The core philosophy is simple: carry only what is truly essential to move faster, cover more ground with less fatigue, and reduce the impact on your body. A lighter pack transforms a grueling trek into a more enjoyable journey, freeing up both physical and mental energy to appreciate the wilderness around you. This approach isn't about spartan suffering; it's about making smart, intentional choices that maximize comfort while minimizing weight.
This comprehensive guide is your definitive ultralight backpacking gear list for 2025 and beyond. We will move past a simple checklist to dissect the seven core systems that form the foundation of any ultralight setup: your shelter, backpack, sleep system (bag and pad), cook kit, water treatment, and clothing. For each category, we will analyze the critical trade-offs between weight, durability, and function, providing actionable insights to help you build a personalized and highly efficient kit. You will learn not just what to carry, but why each piece earns its place in your pack.
Achieving a low base weight is a process of careful refinement and research. While brands like TREKOLOGY focus on engineering compact, lightweight essentials that enhance comfort without adding bulk, the broader market is vast. As you begin to evaluate your options and compare specifications, exploring the Best Backpacking Gear Brands is a crucial step to ensure you invest in quality and durability. This list is designed to empower you with the knowledge to select the right gear, assemble a cohesive system, and hit the trail with confidence.
Your shelter is the cornerstone of your "Big Three" (shelter, backpack, and sleep system) and represents the most significant opportunity for weight reduction in your pack. An ultralight shelter is defined as a system weighing under two pounds, a feat achieved by moving beyond traditional, heavy double-wall tents. These minimalist shelters utilize innovative single-wall designs, trekking pole support systems that eliminate dedicated tent poles, or simple tarp setups to provide essential weather protection without the weight penalty. Choosing the right one is a foundational step in building your ultralight backpacking gear list.
Shaving two, three, or even four pounds by switching to an ultralight shelter has a cascading effect, allowing you to use a lighter backpack and reducing strain on your body. This makes long-mileage days more achievable and enjoyable. Leading examples have been proven over thousands of miles on trails worldwide. The Zpacks Duplex, weighing just 19.4 ounces, is a favorite among Pacific Crest Trail thru-hikers for its incredible space-to-weight ratio. Similarly, the Gossamer Gear The One (28 oz) is a common sight on the Appalachian Trail, while the Big Agnes Fly Creek HV UL1 (32 oz) offers a familiar tent-like structure for solo adventurers transitioning to ultralight principles.
To simplify the key metrics, this summary box visualizes the typical specifications for an ultralight shelter.

The data highlights the direct relationship between advanced materials like Dyneema Composite Fabric, extremely low weight, and a higher price point, a common trade-off in high-performance gear.
For a deeper dive into selecting the right shelter for your needs, this video provides excellent guidance on balancing weight, space, and weather protection.
Getting the most out of a minimalist shelter requires practice and care. Follow these actionable tips to ensure comfort and longevity:
Your sleep system is the second pillar of your "Big Three," and along with your shelter, it's a prime target for substantial weight savings. Ultralight sleeping bags and quilts achieve their low weight by shedding unnecessary features, using premium high-fill-power down insulation, and employing minimalist designs. Quilts, an innovation popularized by designers like Ray Jardine, take this a step further by removing the back insulation and zipper, which is useless when compressed beneath your body. This elegant solution is a critical component of any modern ultralight backpacking gear list.
Dropping one or two pounds from your sleep system directly reduces your base weight, making your pack feel lighter and enabling you to hike further with less fatigue. The choice between a quilt and a bag is central to this. Quilts offer unparalleled weight savings and freedom of movement, while ultralight mummy bags provide a familiar, enclosed sense of warmth. Premier examples have set the standard on the world's toughest trails. The Enlightened Equipment Revelation quilt is a near-ubiquitous sight on the Pacific Crest Trail for its customizable and efficient design. For those needing maximum warmth in a traditional package, the Western Mountaineering UltraLite is a gold standard trusted on serious expeditions. Meanwhile, the Feathered Friends Flicker UL offers a versatile hybrid, functioning as both a quilt and a bag.
An ultralight sleep system performs best when used correctly. A quilt, in particular, requires a slightly different approach than a traditional sleeping bag. Use these tips to guarantee a warm and comfortable night.
Your backpack is the chassis that carries your entire life on the trail and the second pillar of the "Big Three." Ultralight packs fundamentally shift the paradigm from heavy, rigid frames to minimalist systems that rely on your gear and smart packing to provide structure. Often frameless or featuring a minimal carbon fiber or wireframe, these packs use advanced materials like Dyneema Composite Fabric and ultralight nylon to strip away every non-essential ounce. A well-chosen ultralight pack is a non-negotiable component of any serious ultralight backpacking gear list.
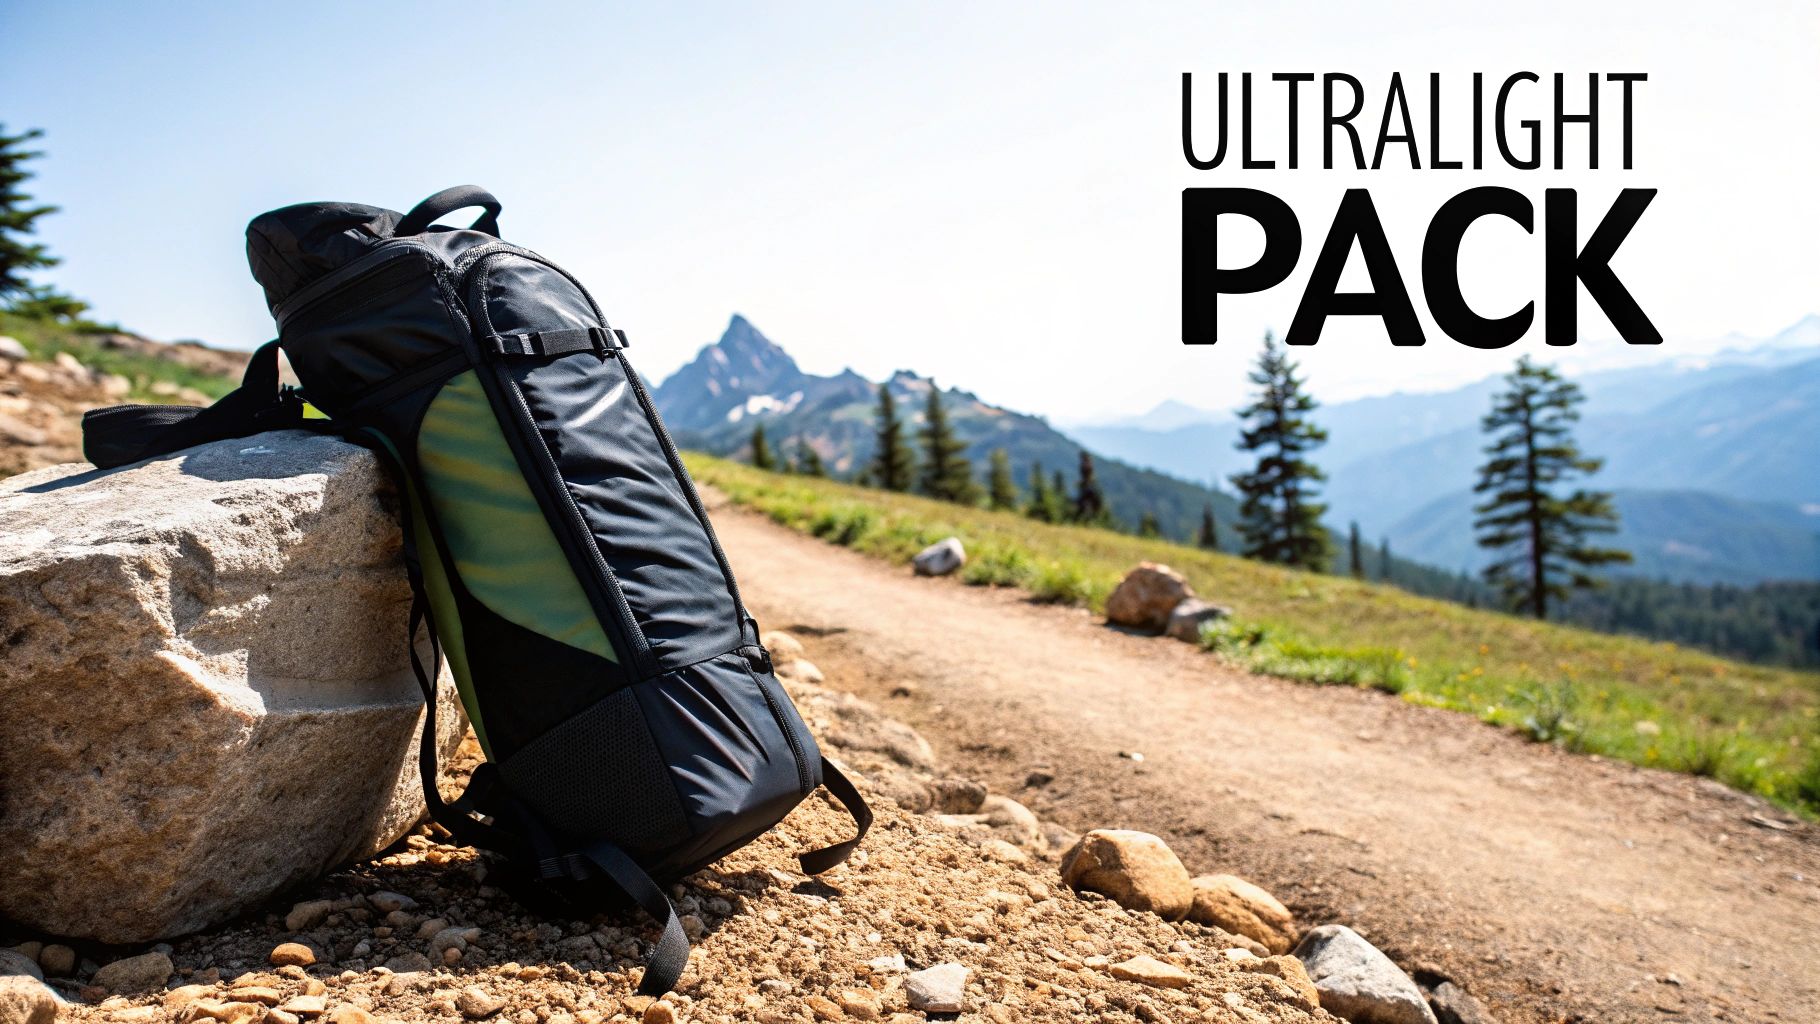
Switching to a pack that weighs under two pounds directly translates to less weight on your shoulders and spine, enabling you to hike further with less fatigue. This concept was popularized by pioneers like Ray Jardine, who championed the frameless pack philosophy. To learn more about the principles of ultralight backpacking, understanding these foundational ideas is key. Modern iterations like the Zpacks Arc Blast (28 oz) have been proven on the grueling Continental Divide Trail, while the Gossamer Gear Mariposa (28 oz) is a thru-hiker staple. The Hyperlite Mountain Gear Southwest (30 oz) excels in rugged, abrasive environments like desert canyons. A comfortable pack means less fatigue at the end of the day, and to further enhance your rest, exploring proven tips for better sleep can make a huge difference in your trail endurance.
An ultralight pack is a high-performance tool that rewards skillful use. Follow these tips to ensure a comfortable and efficient carry:
A sleeping pad is a non-negotiable part of your sleep system, serving the dual purposes of providing cushioning for comfort and, more critically, insulating you from the cold ground. Ultralight pads have revolutionized backpacking comfort by using advanced baffle constructions and reflective thermal materials to deliver high R-values (a measure of insulation) at a fraction of the weight of traditional self-inflating mats. Selecting a modern, lightweight inflatable pad is a key decision when assembling a truly effective ultralight backpacking gear list.
A quality night's sleep is the foundation of recovery and endurance on the trail, and your sleeping pad is the direct interface between you and the ground. A poor pad can lead to a cold, sleepless night, draining your energy for the next day's hike. Brands like Therm-a-Rest, which pioneered modern inflatable technology, and innovators like NEMO Equipment and Big Agnes have pushed the boundaries of what’s possible. The iconic Therm-a-Rest NeoAir XLite is a perennial favorite on the PCT for its unmatched warmth-to-weight ratio. For those pushing into colder seasons, the NEMO Tensor Insulated offers quiet comfort and impressive insulation, while the Big Agnes Q-Core SLX is a go-to for side sleepers who crave extra cushioning.
Inflatable ultralight pads are high-performance items, but their lightweight materials require mindful use to ensure reliability and longevity. Follow these tips to keep your pad in top shape:
Access to safe drinking water is non-negotiable, but traditional pump filters are often heavy and bulky. An ultralight water treatment system prioritizes efficiency and minimal weight, using methods like compact squeeze filters, chemical purification, or UV light to make water safe without the penalty of a one-pound pump. These modern solutions are fast, effective, and so small they can disappear into a hip belt pocket, making them a mandatory component of any serious ultralight backpacking gear list.
Switching from a traditional pump filter to an ultralight option can save you a full pound or more, a significant reduction that makes a real difference in your pack's total weight. The most popular systems have been trail-proven for their reliability and ease of use. The Sawyer Squeeze is a thru-hiker icon, weighing only 3 ounces and allowing you to filter water directly into your bottle. Chemical treatments like Aquamira are a featherlight option often seen on the Appalachian Trail, serving as either a primary method or a foolproof backup. For alpine environments with clear water, a UV sterilizer like the SteriPEN neutralizes viruses and bacteria with light, though it is dependent on battery power.
The primary trade-offs involve treatment time, effectiveness against different pathogens, and maintenance requirements. Squeeze filters work instantly but can clog with sediment, while chemical drops require a waiting period but are maintenance-free.
For a more visual comparison of these methods, many online videos break down the pros and cons of squeeze filters versus chemical and UV treatments, helping you match a system to your specific hiking style.
Using these minimalist systems effectively requires smart habits on the trail. Adopt these practices to ensure you always have safe, clean water:
An ultralight cooking system strips backcountry meal preparation down to its bare essentials: boiling water. This philosophy shifts the focus from gourmet camp cooking to maximum efficiency and minimum weight, often involving simple canister stoves, DIY alcohol stoves, or even eliminating the stove entirely. Adopting a minimalist approach to your kitchen is a critical step in refining your ultralight backpacking gear list and can save a surprising amount of weight and bulk.
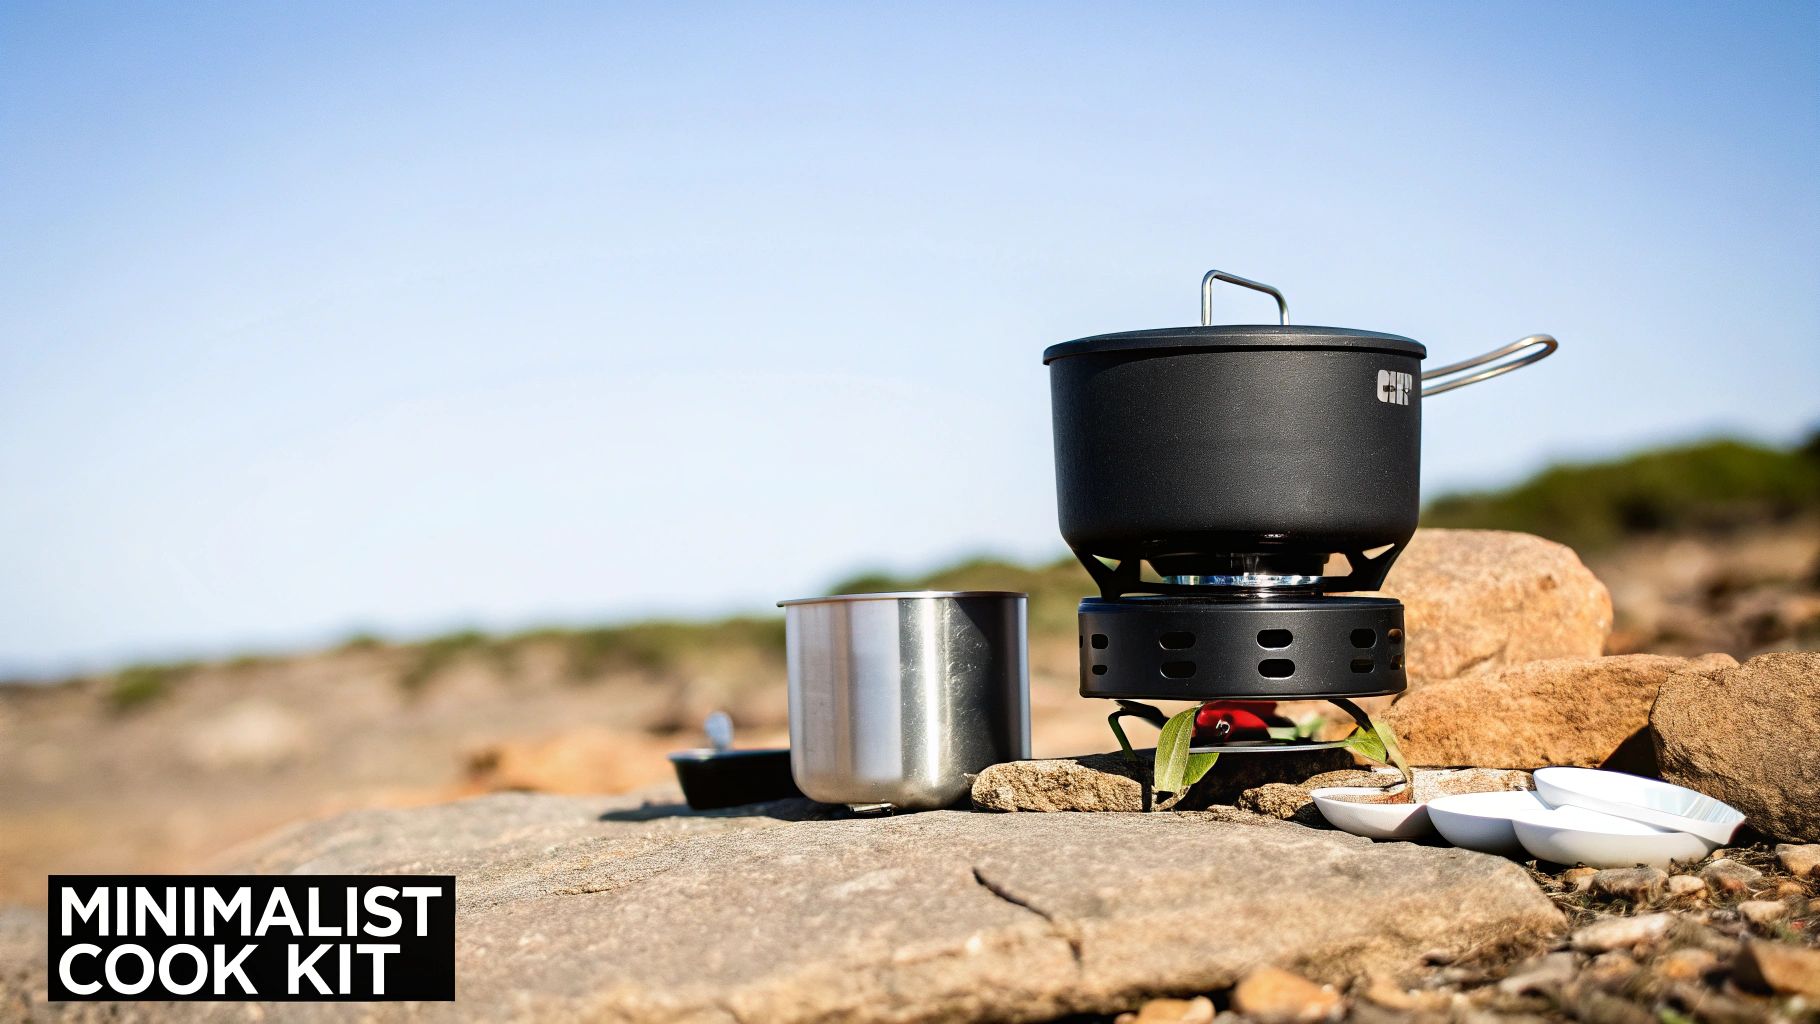
Moving beyond integrated stove systems or heavy pot sets can easily cut a pound or more from your pack. The weight savings are threefold: a lighter stove, a smaller pot, and less fuel carried. This principle is championed by pioneers like Ryan Jordan of Backpacking Light, who advocated for the efficiency of alcohol stoves. Thru-hiker ingenuity led to DIY wonders like the "Fancy Feast" stove, while the tiny BRS-3000T canister stove (under 1 ounce) became a community favorite for its sheer minimalism. For the ultimate weight purist, the "cold soaking" method, often using a simple Talenti jar, eliminates the need for a stove, fuel, and pot altogether, representing the pinnacle of ultralight food strategy. When selecting your components, understanding the trade-offs is key; you can learn more about choosing camping cookware to decide between materials like titanium and aluminum.
A minimalist kitchen requires smart techniques to ensure you get a hot meal efficiently. Practice these tips to become proficient with your ultralight setup:
Your clothing is your first line of defense against the elements and a critical component of your safety and comfort on the trail. An ultralight clothing system moves beyond simply packing clothes, treating them as a cohesive, multi-functional unit designed for maximum performance with minimum weight. This philosophy prioritizes layering with advanced synthetic or merino wool fabrics, ensuring every item serves a purpose, often more than one. Building this system correctly is a vital step in refining your ultralight backpacking gear list.
A dialed-in clothing system keeps you comfortable across a wide range of temperatures and weather conditions without the burden of redundant, heavy garments. By selecting versatile, lightweight pieces, you can reduce your clothing weight to just a few pounds. Industry pioneers have led this charge; Patagonia perfected the packable wind layer with its iconic Houdini jacket (around 3.7 oz), while Smartwool made Merino 150 base layers a staple for their incredible temperature regulation and multi-day, odor-free wear. Meanwhile, cottage companies like Enlightened Equipment offer hyper-efficient core warmth with items like the Torrid vest, which provides crucial insulation for minimal weight penalty. This strategic approach ensures you carry only what is essential for safety and adaptability. For a complete breakdown of what to pack, this ultimate guide to backpacking clothes offers a comprehensive checklist for different conditions.
Optimizing your clothing requires a shift in mindset from "packing for every possibility" to "layering for every probability." Use these tips to build an efficient system:
| Item | Implementation Complexity 🔄 | Resource Requirements ⚡ | Expected Outcomes 📊 | Ideal Use Cases 💡 | Key Advantages ⭐ |
|---|---|---|---|---|---|
| Ultralight Shelter System (Tent/Tarp) | Moderate - requires pitching skill | Moderate - trekking poles, stakes | Lightweight shelter, weather protection | Backpacking requiring weight savings | Very light (1-2 lbs), fast setup, versatile pitches |
| Ultralight Sleeping Bag/Quilt | Moderate - learning curve on use | Moderate - high fill-power down | Warmth with minimal weight | 3-season camping, minimalist sleepers | 30-50% lighter than traditional bags, better temp regulation |
| Ultralight Backpack | Moderate - needs packing discipline | Low to moderate - ultralight materials | Comfortable load under 20 lbs base weight | Long-distance hikes with minimal gear | 2-4 lbs lighter, flexible, simple design |
| Ultralight Sleeping Pad | Low - standard setup | Moderate - advanced materials | Insulation and comfort with minimal weight | Essential for quilt sleep systems | High warmth-to-weight ratio, compact pack size |
| Ultralight Water Treatment System | Low - simple operation | Low - tablets, UV light, small filters | Safe drinking water efficiently | Lightweight water purification on trail | Very light (1-6 oz), no moving parts, effective virus treatment |
| Ultralight Cooking System | Low to moderate - stove handling | Low - minimal stoves, cookware | Basic heating/cooking with low weight | Quick meals or cold-soaking meals | Extremely light (0.5-3 oz stoves), fuel efficient |
| Ultralight Clothing System | Moderate - needs layering knowledge | Moderate - synthetic/merino fabrics | Versatile warmth and weather protection | Variable climate backpacking | Multi-function layers, significant weight reduction |
You've just explored a comprehensive breakdown of the components that make up a modern ultralight backpacking gear list. The journey from here isn't about discarding your entire closet of gear in one fell swoop. Instead, it's about making strategic, incremental changes. The most critical takeaway is to stop viewing your equipment as a collection of individual items and start seeing it as an integrated system, where every piece works in harmony to reduce weight and increase efficiency.
This shift in mindset is the true secret to ultralight backpacking. It's a philosophy of intentionality that transforms your experience on the trail, freeing you from the burden of a heavy pack and allowing you to connect more deeply with the wilderness around you. The goal is more miles with less pain, more enjoyment of the views, and less time wrestling with cumbersome gear.
Embarking on the path to an ultralight setup can feel overwhelming, but a structured approach makes it manageable. The key is to be methodical and patient, focusing on the changes that will provide the most significant impact first. Don't feel pressured to achieve a sub-10-pound base weight on your very next trip.
Start with the "Big Three." Your shelter, your backpack, and your sleep system (sleeping bag or quilt) are almost always the heaviest items you carry. By upgrading these three core components, you can often shed five to ten pounds in a single step. This is the most effective way to make immediate, noticeable progress. For example, moving from a traditional 5-pound tent to a 2-pound ultralight shelter instantly lightens your load and frees up significant space in your pack.
Create a gear spreadsheet. This is a non-negotiable step for anyone serious about going ultralight. List every single item you plan to carry, from your tent stakes to your toothbrush, and weigh each one with a kitchen scale. This simple document provides a powerful, data-driven overview of your pack. It reveals exactly where your weight is hiding and allows you to make informed decisions about what to upgrade or leave behind next.
Once you've addressed the Big Three, the refinement process begins. This is where the mantra "ounces make pounds" truly comes to life. Small, seemingly insignificant swaps can collectively add up to a substantial weight reduction.
Consider these smaller, high-impact changes:
Finally, remember that your clothing is a critical part of your gear system. The layers you wear and the footwear you choose directly impact your comfort, safety, and overall weight. Avoid cotton at all costs and opt for merino wool or synthetic fabrics that wick moisture and regulate temperature effectively.
Your feet are your foundation on the trail, so investing in lightweight, supportive footwear is non-negotiable. Many modern backpackers have moved away from heavy, stiff boots in favor of lighter trail runners that reduce fatigue. For a deeper dive into selecting the perfect pair, this guide on buying running shoes offers excellent, detailed advice that applies well to trail footwear.
Your ultralight journey is a personal one. Use this guide as your roadmap, but don't be afraid to experiment. Borrow gear from friends, test different configurations on short trips, and discover what truly works for your body and your hiking style. The reward is a profound sense of freedom and capability on the trail that makes every ounce you counted well worth the effort.
Ready to start making smart, functional upgrades to your kit? Explore the innovative and accessible gear from TREKOLOGY, designed to reduce your pack weight without sacrificing comfort or breaking the bank.
Leave a comment