Certified Business
With over 10,000 orders
With over 10,000 orders

Dehydrating your own food is the secret to creating amazing backpacking meals that are lightweight, packed with nutrients, and easy on your wallet. It's how you take full control of every ingredient, skip the weird preservatives, and dial in the flavors to be exactly what you crave after a long day on the trail. You're basically turning your favorite home-cooked dishes into trail-ready fuel.
The convenience of those pre-packaged backpacking meals is hard to ignore. Just grab a pouch, and you’re set. For years, that was my go-to. But the sticker shock and that "brick in the stomach" feeling I'd get afterward finally pushed me to look for a better solution.
At nearly $15 per meal, the cost piles up fast on a multi-day trip. On top of that, the sky-high sodium and mystery preservatives often left me feeling sluggish instead of re-energized.
Making the switch to dehydrating my own food was a total game-changer. Suddenly, I was the one calling the shots on my trail nutrition. This is a huge deal if you're managing dietary restrictions like gluten intolerance, nut allergies, or a vegan diet. You know exactly what’s in your food because you’re the one who put it there.
When you're standing in the gear shop, it's easy to be tempted by the colorful pouches lining the shelves. But how do they really stack up against a meal you make yourself? Here’s a quick breakdown.
| Factor | DIY Dehydrated Meals | Store-Bought Meals |
|---|---|---|
| Cost Per Serving | Typically $3-5. Dramatically lower since you buy ingredients in bulk. | Often $10-15+. You're paying a premium for convenience and packaging. |
| Nutrition | You have 100% control. Lower sodium, no preservatives, tailored macros. | High in sodium and preservatives. Less control over nutritional content. |
| Flavor | Tastes like a real, home-cooked meal because it is one. | Flavors can be a bit generic or artificial. |
| Customization | Infinite. Adjust spice levels, portion sizes, and ingredients to your liking. | Limited to the options on the shelf. "One-size-fits-all" portions. |
| Prep Time | Requires planning and time at home for cooking and dehydrating. | Minimal. Just grab and go. |
While store-bought meals win on pure convenience, a little bit of prep at home gives you a massive advantage in every other category—especially your wallet and your taste buds.
Think of dehydrating as becoming your own personal trail chef. You can tweak recipes to be more calorie-dense for those tough, high-mileage days or keep them light and simple for a casual weekend out.
Here are a few of the biggest wins:
By taking control of your trail kitchen, you move from simply surviving in the backcountry to truly thriving. Every meal becomes a delicious reward that you designed.
Ultimately, dehydrating your own food becomes a rewarding part of the whole backpacking experience. The benefits of dehydrated backpacking and camping food are incredible—these meals are lightweight, compact, and super simple to whip up on the trail. As research on the dehydrated food market from businessresearchinsights.com shows, their convenience is a huge asset when time and fuel are precious. It turns meal prep from a chore into a creative process that fuels your best adventures.
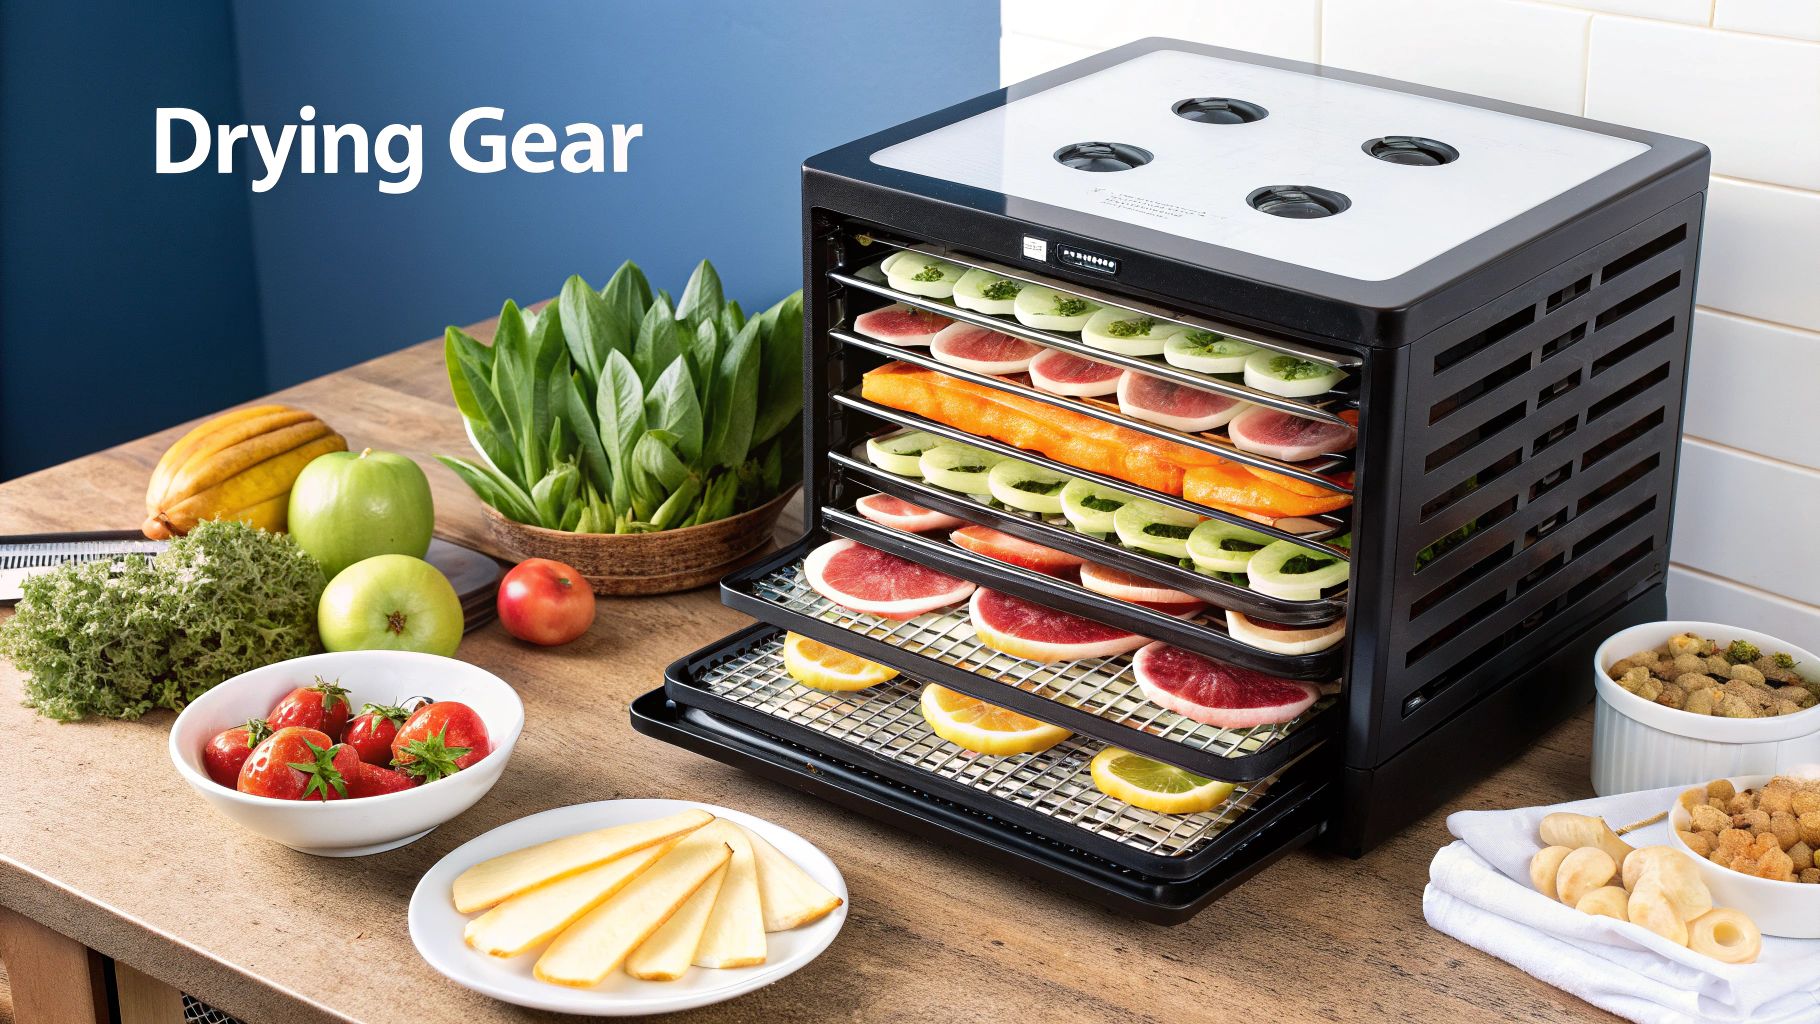
Picking out your first food dehydrator can feel like a huge commitment, but it really just comes down to two main designs. Your choice here will affect everything from how evenly your food dries to the kinds of recipes you can pull off. Think of it as a cornerstone piece of your backpacking gear essentials, the tool that unlocks all those delicious, lightweight trail meals.
The two players in the game are stackable dehydrators and shelf dehydrators. They both get the job done, but their methods and the results are worlds apart.

These are the round guys you see most often. They have a fan and a heating element at the bottom (or sometimes the top), which forces hot air up through the middle of the trays.
These look more like a little countertop oven. The fan and heater are mounted on the back wall, pushing warm air straight across all the trays at once.
If you’re dreaming of perfect beef jerky or smooth, tear-free fruit leathers, just spring for the horizontal airflow model. Trust me. The even heat makes all the difference and saves you a ton of frustration.
Forget the flashy marketing. When you’re comparing models, only a couple of features truly matter for making great trail food.
Here’s what you absolutely need:
Your dehydrator is the main event, but a few supporting players will make your prep work so much easier and open up a whole new world of recipes.
With the right setup, you’re ready to create meals that are miles ahead of anything you can buy in a pouch. You'll be making trail food that retains its flavor and nutrients, perfectly prepped for your next adventure.
Alright, with your equipment sorted, we can get to the fun part—turning fresh, everyday ingredients into lightweight trail fuel. This is where the real craft comes in. Successfully dehydrating food for backpacking isn't as simple as just throwing food on a tray; it’s about knowing how to prep different foods to get the best results when you're miles from civilization.
Every ingredient behaves a bit differently. Vegetables often need a little coaxing to keep their color and texture, while meats demand careful handling to make sure they’re safe for the long haul. Nail these details, and you'll be rewarded with meals that rehydrate perfectly and actually taste like real food.
Veggies are the cornerstone of most of my backpacking meals, but they need some TLC before they meet the dehydrator. A few extra minutes of prep work makes a massive difference in how they turn out.
For a lot of vegetables, especially the dense ones like carrots, green beans, and corn, blanching is non-negotiable. This just means giving them a quick boil for a couple of minutes before plunging them into an ice bath to stop the cooking. Why bother? Blanching locks in their color, flavor, and nutrients. It also makes them dry faster and, more importantly, rehydrate quicker on the trail.
Here’s my cheat sheet for common trail veggies:
For most vegetables, I aim for a temperature of about 125-135°F (52-57°C). You'll know they're done when they're brittle and snap cleanly. If a piece still bends, it’s not ready.
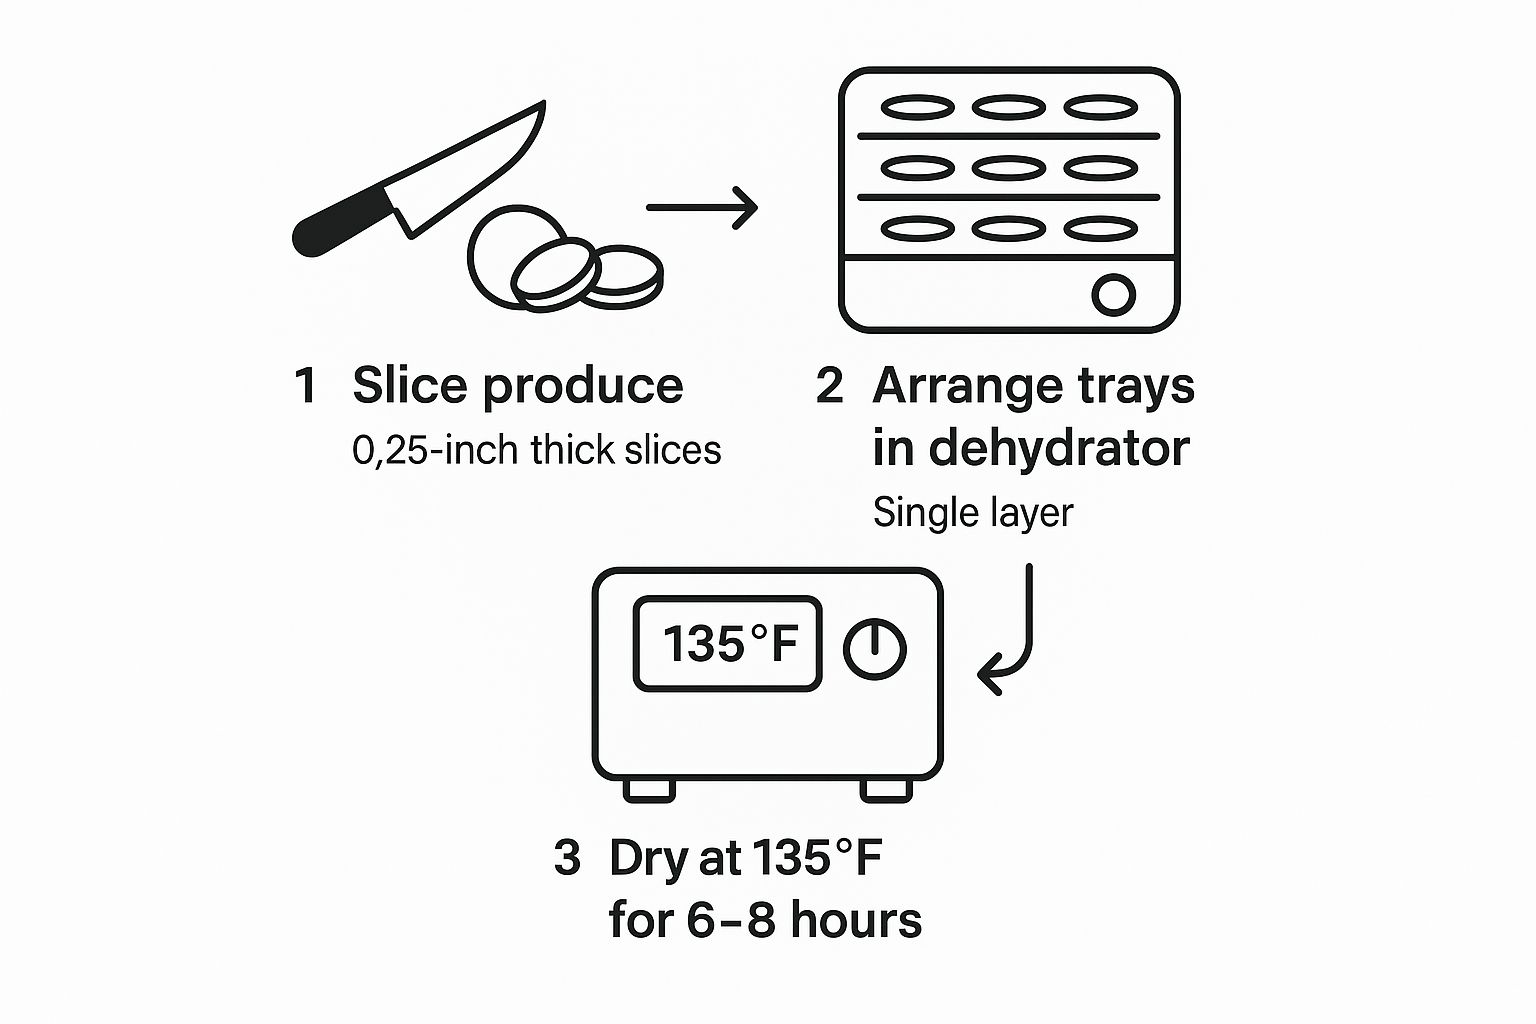
This simple slice, arrange, and dry process is the foundation for almost any fruit or vegetable you want to take on your adventures.
The idea of dehydrating meat can seem a little intimidating, but it's totally safe and simple if you stick to a few golden rules. The single most important rule? Always, always use lean meat. Fat is the enemy here; it doesn't dehydrate and will eventually go rancid, ruining all your hard work.
If you’re using ground meat like beef or turkey, make sure it’s 93% lean or higher. Cook it thoroughly with your seasonings, then—and this sounds weird, but trust me—rinse it with hot water. This washes away any remaining fat. It's a critical step for shelf stability. After rinsing, just spread it on your trays and let the dehydrator do its thing.
No matter the protein, the final product should be bone-dry and hard, with zero soft spots. Get the prep right, and you’ll have safe, calorie-dense protein that rehydrates wonderfully.
Carbs are your fuel out on the trail. By dehydrating them at home, you're essentially pre-cooking them, which dramatically cuts down your cook time at camp and saves precious fuel.
Cook up your pasta, rice, or quinoa just like you normally would. For pasta, I actually like to cook it a minute or two past al dente to make sure it rehydrates soft. Once it's cooked, a quick rinse under cool water gets rid of extra starch and stops everything from clumping together.
Spread your cooked grains out in a thin, even layer on the dehydrator trays. A temperature of 135°F (57°C) works perfectly until they're completely hard and dry.
Sauces are, without a doubt, one of the best things you can dehydrate. Imagine turning your favorite low-fat marinara, curry, or chili into a super-light powder or "leather." It's a game-changer.
To pull this off, just make sure your sauce is low in fat. For the most even drying, I blend it until it's perfectly smooth. Then, spread it thinly onto a silicone sheet or piece of parchment paper. Dry it at 135°F (57°C) until it turns into a flexible, leathery sheet that isn’t sticky. You can either break it into pieces or blitz it in a blender to make a powder.
Once you get the hang of these techniques for different ingredients, you can start building a pantry of lightweight components for your own custom trail meals. The possibilities are endless, and you can guarantee every dinner will be one you actually look forward to eating.
Okay, you've got a pantry stocked with perfectly dehydrated ingredients. Now the real fun begins. This is where you go from simply drying food to crafting complete, mouth-watering meals that will have you dreaming of dinnertime out on the trail. We're not just talking about rehydrated veggies here; we're building a truly satisfying experience.
Forget about those bland, one-note trail dinners. With your prepped components, you can assemble surprisingly complex and flavorful recipes. Think about a hearty lentil shepherd's pie or a zesty Pad Thai—these aren't just trail fantasies; they're totally achievable.
A great trail meal has to do more than just taste good—it needs to give you the sustained energy to power up that next big climb. The secret is all in balancing your macronutrients: carbohydrates, proteins, and fats. A classic mistake is loading up on just one of these, which almost always leads to an energy crash later on.
For a solid dinner that refuels your muscles and sets you up for the next day, you'll want to aim for a balanced mix:
Your goal on the trail isn't just to feel full, but to feel fueled. A meal combining carbs for immediate energy, protein for repair, and fats for long-term power is the ultimate trifecta for backcountry performance.
Carrying too much food is a rookie mistake we've all made, and it adds nothing but dead weight to your pack. Learning to dial in your portion sizes is a skill that pays off big time. My own method is pretty simple but it works.
First, I set a calorie target for the meal. For a hearty dinner after a long day of hiking, I'm usually shooting for 600-800 calories. Then, I just assemble my dehydrated ingredients and weigh them out. Here’s a quick look at one of my go-to recipes, Lentil Shepherd's Pie, to show you what I mean.
| Ingredient | Dry Weight (per serving) |
|---|---|
| Dehydrated Cooked Lentils | 1/2 cup (approx. 90g) |
| Dehydrated Veggie Mix | 1/4 cup (approx. 25g) |
| Dehydrated Mashed Potatoes | 1/2 cup (approx. 60g) |
| Tomato Powder & Spices | 1 tbsp (approx. 10g) |
| Total Dry Weight | ~185 grams |
This incredibly lightweight little package rehydrates into a surprisingly filling and nutritious meal. By weighing each component, you can create consistent, perfectly-portioned meals every single time. If you want to dive deeper into planning, be sure to check out our complete backpacking food and meal planning guide.
This level of customization is exactly why so many of us are making our own trail food. The market for dehydrated backpacking meals has grown as more people look for healthier, preservative-free options. This trend is also making it easier than ever to get supplies. Creating your own meals puts you in the driver's seat, ensuring every bite is exactly what your body needs out there.
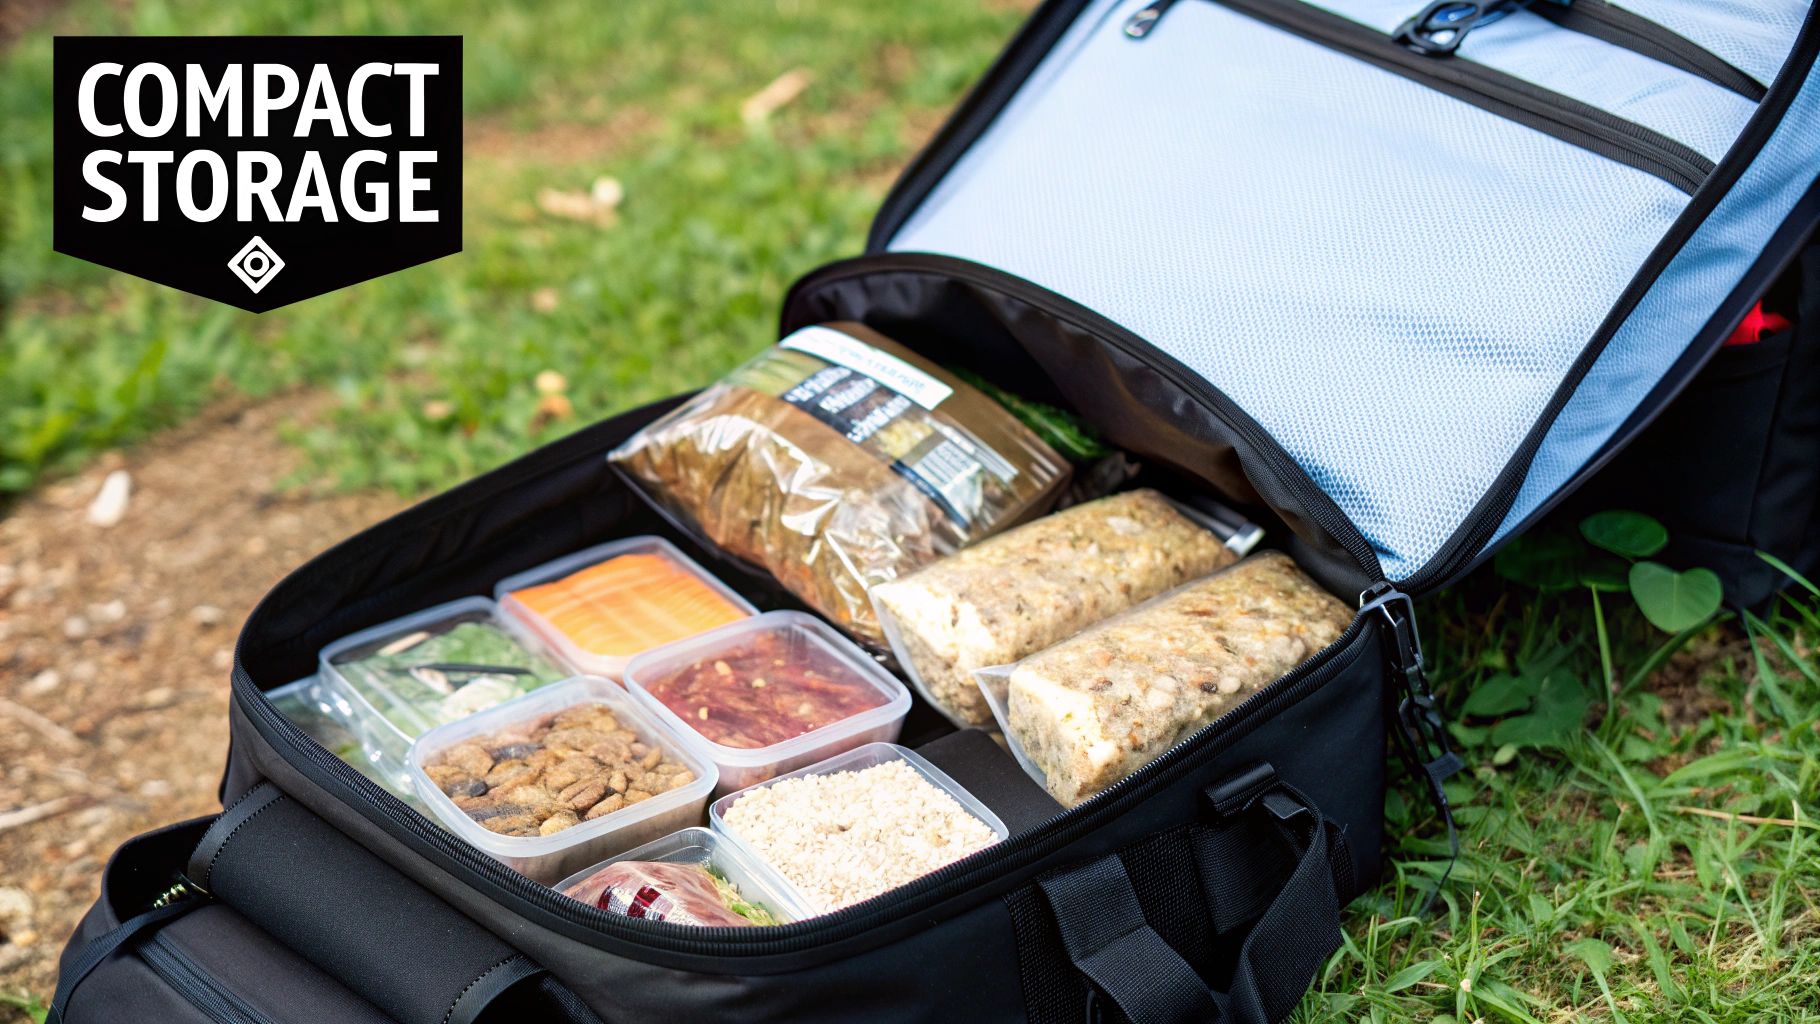
All that effort you put into choosing, prepping, and drying your trail meals can go to waste in an instant if you don't store them correctly. Think of proper storage as the final, critical step. The biggest enemies of your delicious, lightweight food are moisture, oxygen, light, and heat—and your storage plan needs to defeat every single one.
First things first: never, ever bag up warm food. It's a rookie mistake that traps condensation, creating a perfect environment for mold to grow. I've learned this the hard way. Now, I always spread my freshly dried ingredients on a baking sheet and let them cool completely to room temperature for at least an hour. Patience here pays off big time.
Once everything is cool, there's another crucial process that most people skip: conditioning. Think of it as an insurance policy for your food. It helps to evenly distribute any tiny, lingering bits of moisture across all the pieces, which prevents any one damp spot from ruining the whole batch.
It's actually pretty simple to do:
If you spot any moisture, it means the food isn't quite dry enough. Just pop it back in the dehydrator for another hour or two. If it stays completely dry for the whole week, congratulations! It's officially conditioned and ready for long-term storage.
How you store your food really comes down to when you plan to eat it. If you're heading out for a quick weekend trip, a basic zip-top freezer bag will do the job. But for longer adventures or for prepping meals months in advance, you'll need a more serious solution. Keeping your food fresh is a key part of trail kitchen hygiene; for a deeper dive, check out these essential food safety tips for camping.
To help you decide, let's break down the most common storage options for dehydrated meals.
Here's a quick comparison of the best ways to store your dehydrated backpacking food, looking at everything from shelf life to durability on the trail.
| Storage Method | Best For | Estimated Shelf Life | Pros | Cons |
|---|---|---|---|---|
| Zip-Top Freezer Bags | Short-term storage (1-2 weeks) | Up to 1 month | Inexpensive, readily available | Not fully airtight, prone to punctures |
| Vacuum Sealing | Mid-term storage (months) | 6-12 months | Removes oxygen, compacts food | Requires a special machine, bags can be costly |
| Mylar Bags | Long-term storage (years) | 1-2+ years | Blocks light and oxygen, very durable | Requires oxygen absorbers, can be pricey |
| Mason Jars | At-home pantry storage | Up to 1 year | Reusable, great for conditioning | Heavy, fragile, not for backpacking |
As you can see, for maximum shelf life and the kind of durability you need in a backpack, Mylar bags paired with oxygen absorbers are the undisputed champions. The oxygen absorbers are little packets that suck up any remaining oxygen in the bag, stopping bacteria and oxidation cold. This is the gold standard if you want to preserve your meals for months, or even years.
My personal system involves storing individual ingredients in vacuum-sealed bags at home and then assembling my meals into Mylar bags about a month before a big trip. This gives me flexibility and ensures maximum freshness on the trail.
This last tip might sound obvious, but your future, trail-weary self will thank you for it: label everything. A simple piece of masking tape and a permanent marker is all you need.
Make sure your label is easy to read and has three key bits of info:
This tiny step eliminates all the guesswork when you’re tired and hungry at camp. It also helps you use your oldest food first and ensures you nail the rehydration every single time. Get your storage and labeling right, and you’ll turn your dehydrated ingredients into reliable, delicious fuel for any adventure.
Even after you've got the basics down, a few questions always seem to pop up when you're getting serious about dehydrating. It happens to everyone. Let's walk through some of the most common hurdles to get you feeling confident, both in your kitchen and out on the trail.
One of the first frustrations is getting the texture right. Have you ever pulled out a batch of fruit only to find it’s still sticky, or had veggies that just won't get brittle? You’re definitely not alone. This almost always boils down to two culprits: cutting your slices too thick or battling high humidity in your kitchen.
To get that perfect, consistent dryness, make sure you're slicing everything to about a quarter-inch thick. If you suspect humidity is the problem, you can try running your dehydrator in a smaller room with a dehumidifier. Or, honestly, just let it run for a few more hours. A little extra time is a simple fix.
Here’s the single most important rule I've learned: cool a sample piece to room temperature before you test it. Food is deceptive when it's warm right out of the dehydrator—it will feel softer and more pliable than it really is.
Give it a few minutes to cool, then check for these signs:
The entire point of this process is to remove 80-95% of the moisture. Anything less is an open invitation for mold and bacteria, which is the last thing you want to find in your food bag miles from anywhere. When in doubt, let it dry longer.
Bringing your food back to life at camp is where all that prep work pays off. The biggest mistake I see people make is not using enough water or not giving the food enough time to soak. You can't rush it. Patience is truly your best friend here.
My go-to method is pretty simple: add just enough boiling water to cover the food, give it a good stir, and seal the container. Let it sit for 10-15 minutes. For denser things like beans or big chunks of meat, I’ve found that a 30-minute pre-soak in cold water before you start heating makes a massive difference.
An insulated pot cozy is an absolute game-changer for this. It traps the heat, letting your meal rehydrate thoroughly without forcing you to burn extra fuel to keep it simmering. This one simple piece of gear makes rehydration reliable and efficient, getting you a perfect hot meal every single time.
Ready to gear up for your next adventure? At TREKOLOGY, we design lightweight, durable equipment to make your time outdoors more comfortable. From trekking poles that save your knees to camp chairs that offer backcountry bliss, we have what you need. Explore our full collection at https://trekology.com and elevate your next trip.
Leave a comment